There are two ways to install a Magento Theme:
- Open your Browse and type : localhost/phpmyadmin
- Then create database
-Click database you have created
alo_biolife_quickstart, we got:

Copy all of folder above to your Magento .
				php bin/magento setup:install --backend-frontname="admin" \
				--key="6f798255dfa145f15cbc9721901a8e69" \
				--db-host="localhost" \
				--db-name="database_name" \
				--db-user="database_user" \
				--db-password="database_password" \
				--language="en_US" \
				--currency="USD" \
				--timezone="America/Chicago" \
				--use-rewrites=1 \
				--use-secure=0 \
				--base-url="http://yourdomain.com/" \
				--base-url-secure="https://yourdomain.com/" \
				--admin-user=admin123 \
				--admin-password="magento_password" \
				--admin-email=admin@gmail.com \
				--admin-firstname=admin \
				--admin-lastname=ladmin \
				--search-engine=elasticsearch7 \
				--elasticsearch-host="localhost" \
				--elasticsearch-port=9200
				php bin/magento indexer:reindex
				php bin/magento setup:static-content:deploy -f
				php bin/magento cache:flush
Video Tutorial: How to install Magento 2 Theme quickstart magento 2.3 or old
If you exist a magento website you can install only template.
1. You use theme in folder theme upload the folders ( app, pub) from the theme package to the root directory ( www, public_html) of your magento software using an FTP client.
Example: open folder: theme
We got:
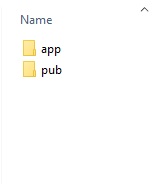
Copy all app, pub above to your Magento.
2. After go to SSH on server and cd to root magento and run 4 commandline below:
php bin/magento setup:upgrade
php bin/magento cache:flush
php bin/magento setup:static-content:deploy -f
php bin/magento indexer:reindex
note: If while run commands above you get error as image below:
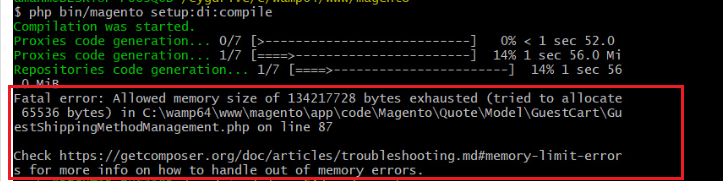
You try add parameter t commands line -dmemory_limit=2G
php -dmemory_limit=2G bin/magento setup:upgrade
php -dmemory_limit=2G bin/magento cache:flush
php -dmemory_limit=2G bin/magento setup:static-content:deploy -f
php -dmemory_limit=2G bin/magento indexer:reindex
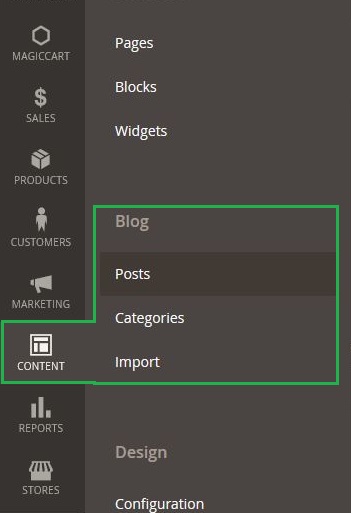
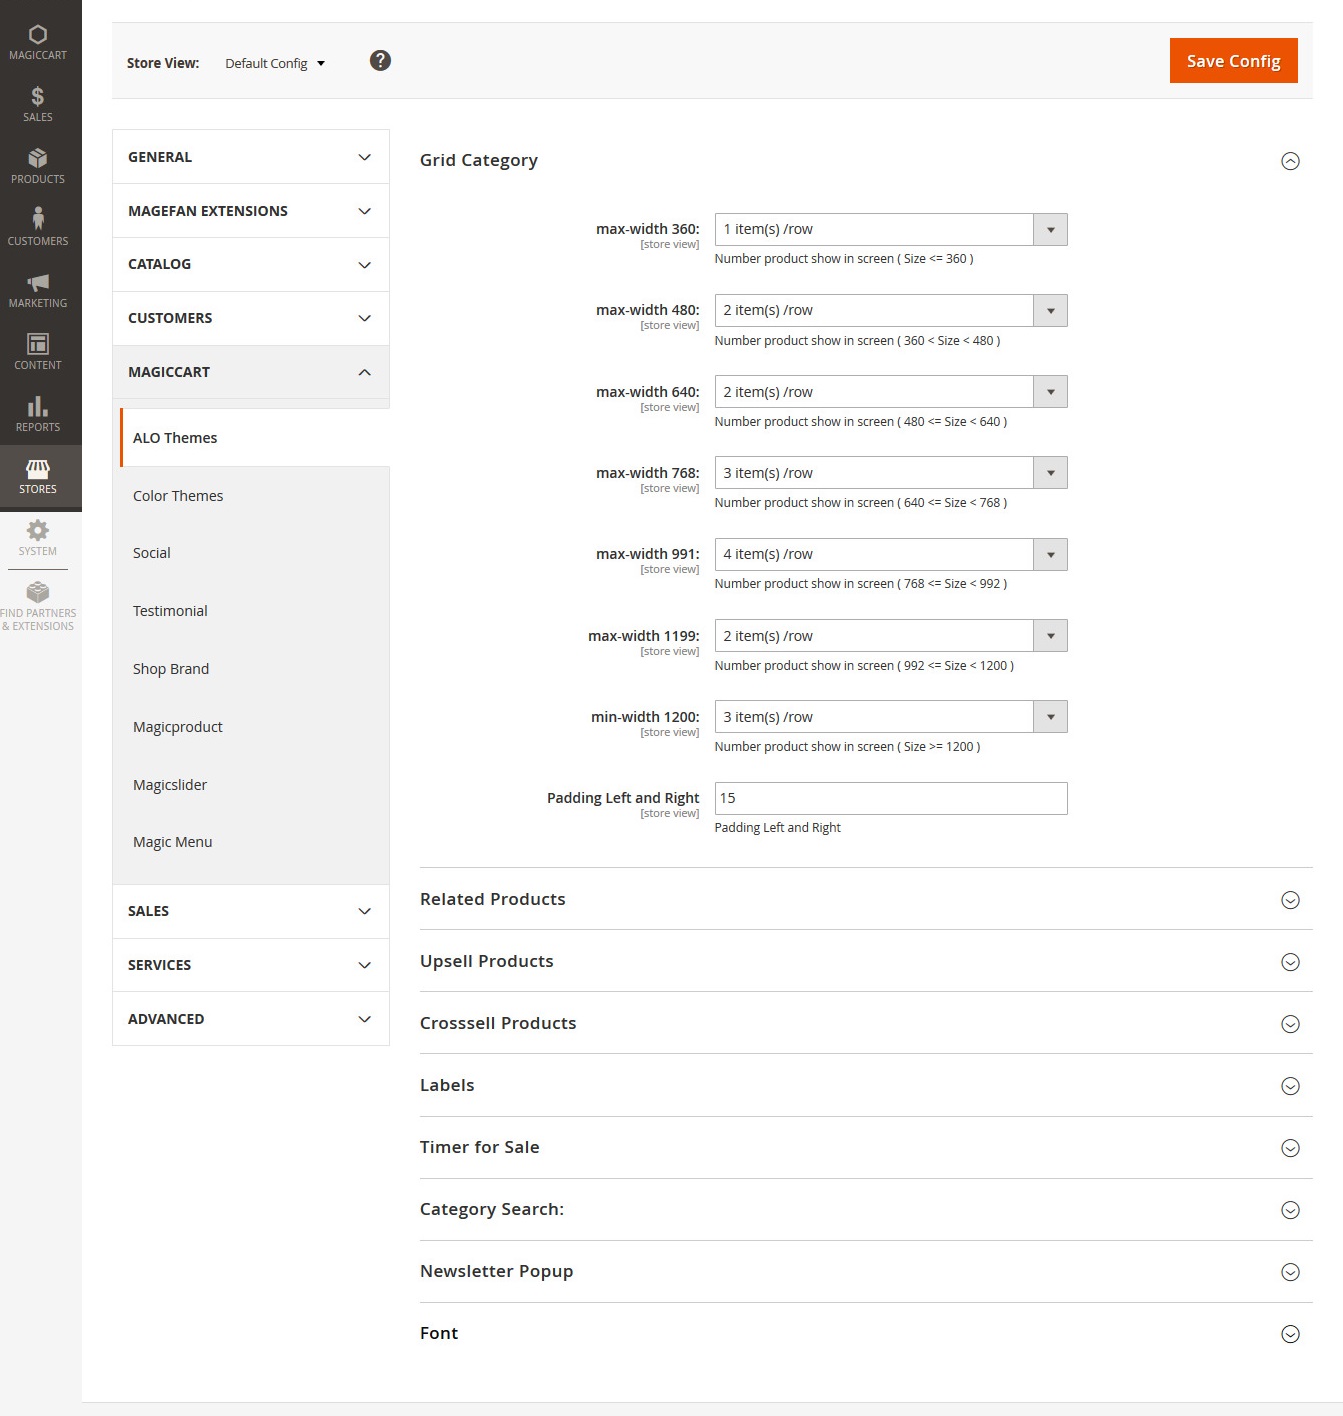
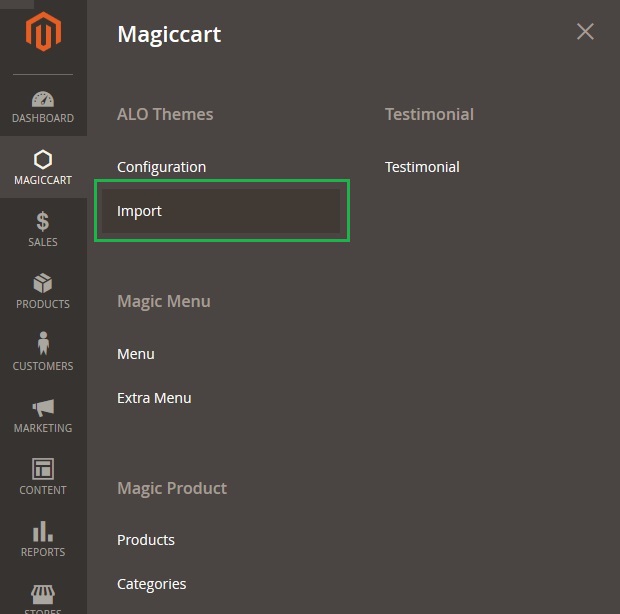
3. Go to Magento Admin: Admin > Magiccart> ALO Theme > Import
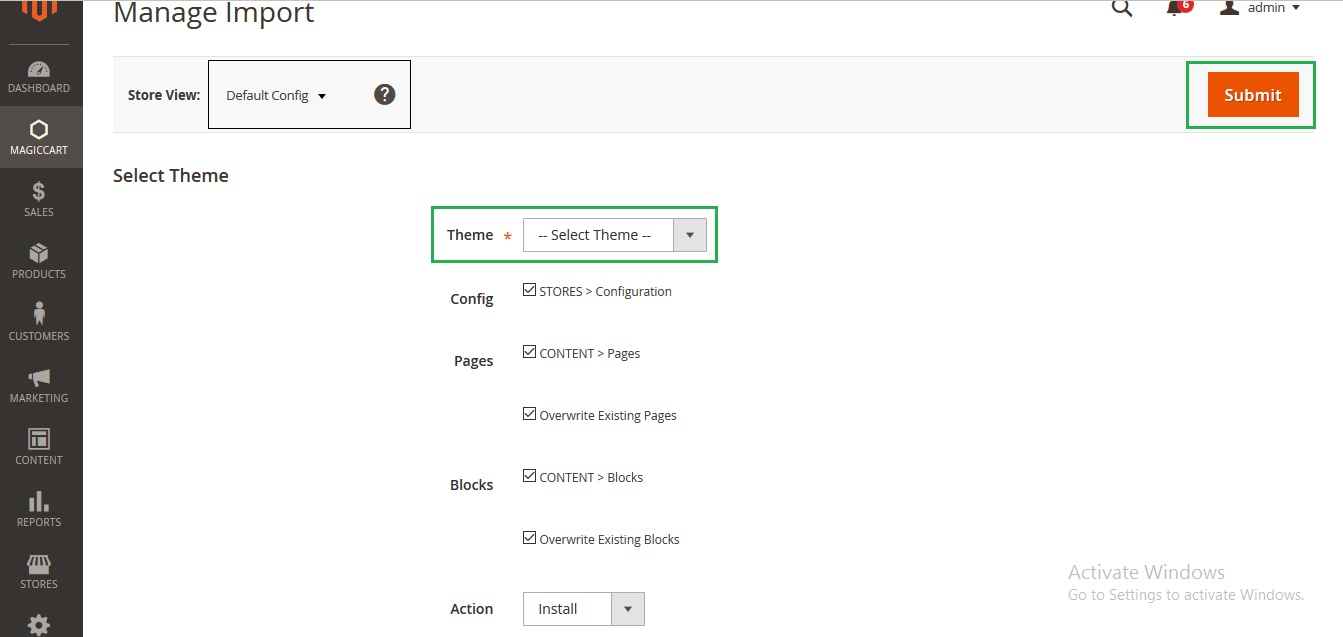
4. Choose Scope Store active theme (or use "Default Config" theme for all store) and Choose theme then click submit button
5. Clear all cache ( System > Cache management > Refesh Cache or Disabled all cache )
If you encounter any problems after installation: flush Magento cache, log out from the admin panel, and log in again.Check again the installation steps and make sure you didn't omit any step. What can cause problems:
a) Magento cache (or external cache) was not flushed after installation of the theme.
b) Some of the theme files were not uploaded.
c) File permissions issue
d) You have some third-party extensions which change/break theme's default behavior or cause some conflicts.
e) You edited theme files and accidentally removed or changed something in the files.
f) You have customized the theme by creating custom sub-theme and your modifications change/break the default behavior of the theme
Also check your log files in var/log/(log settings shouldbe enabled in the admin panel:STORES >Configuration>ADVANCED>Developer for more information about possible errors.
The following chapter describes some of the basic Magento settings and features. Please note that as authors of this theme we provide support only for the issues related strictly to the theme. Support for Magento configuration/ installation/ maintenance etc. is beyond the scope of our support. This chapter should be only treated as a starting point, more information about Magento can be found in Magento documentation : Magento help
When developing your Magento store,you want to see the changes you have implemented. Inorder tobe ableto see changes immediately, you should completely disable the cache.Youcan enable it after you finish configuring your store.
If the cache is enabled, always refresh the cache after making changes in the store/theme/extension configuration.
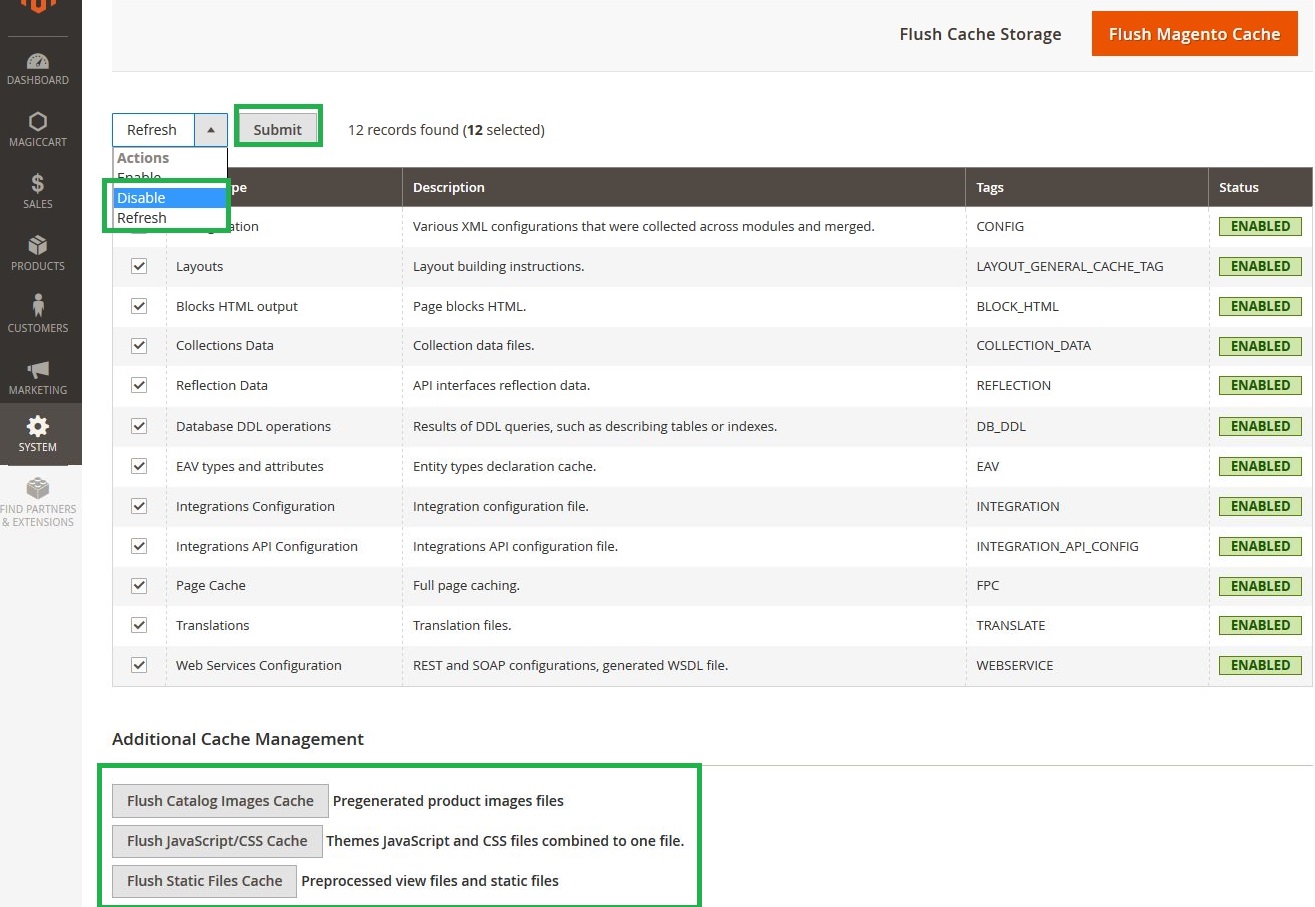
To access the cache management screen, go to System >Cache Management.
Go to System >Cache Management.Click the following buttons to completely clear the store cache:
Step1. Flush Magento Cache
Step2. Flush Cache Storage
Step3. Flush Catalog Images Cache
Step4. Flush JavaScript/CSSCache
Magento indexes most of its data in order to access it faster.If You make changes to your store such as editing products, adding categories, changing urls, etc. you will need to reindex the data so that the changes can show up on your frontend.
To access the index management screen,go to System > Index Management.To rebuild your indexes, select all,select Reindex Data and click Submit button.
In Magento you can enable the theme on many levels.You can set one theme for the entire store,but can also set different themes for different parts ofthe store (even for selected categories, products or CONTENT pages).
If you want all your store pages to look the same (to use the same theme), your theme should only be enabled in STORES >Configuration >Design Theme(the same as it was described in the installation steps3. Installation).You need to remove all theme over rides from categories, products and CONTENT pages.
There are many places where a theme can be enabled. If you have just installed a fresh copy of Magento, those places will be empty. Other wise, please take a look at these sections of the admin panel:
Leave--Please Select--in thesefields,like on the following screenshot:

Remember to flush the cache after you change design settings.
Note:
More info about categories in Magento can be found in :
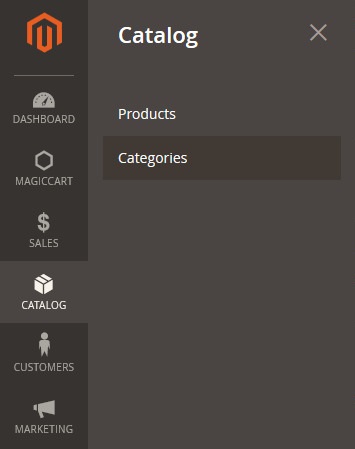
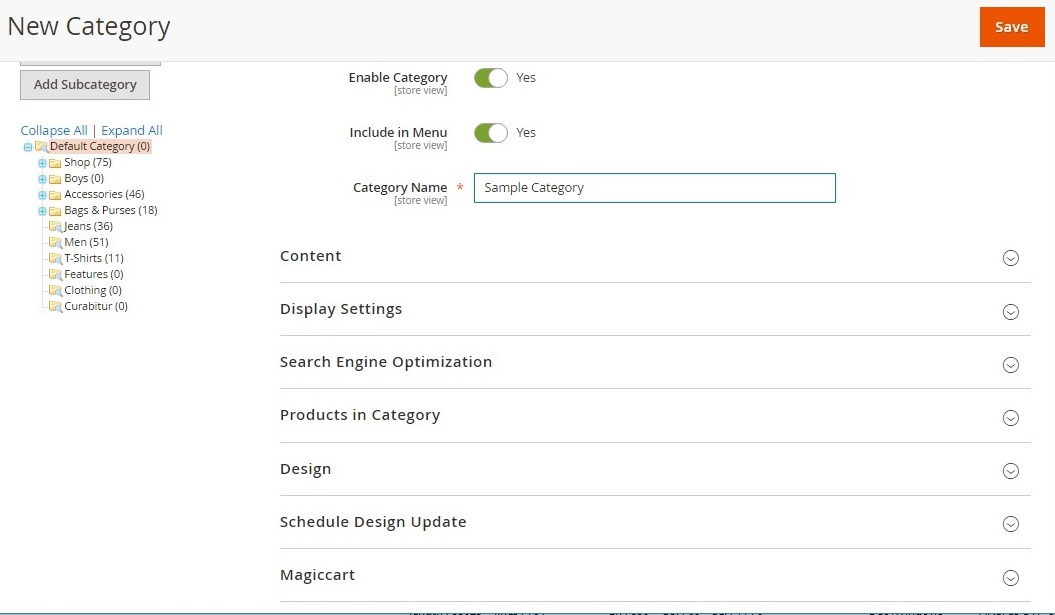
To create and edit categories in Magento, navigate to Catalog > Categories
Categories section of the admin panel. After installation of Magento your category tree is almost empty, there is only the root category (name Default Category):
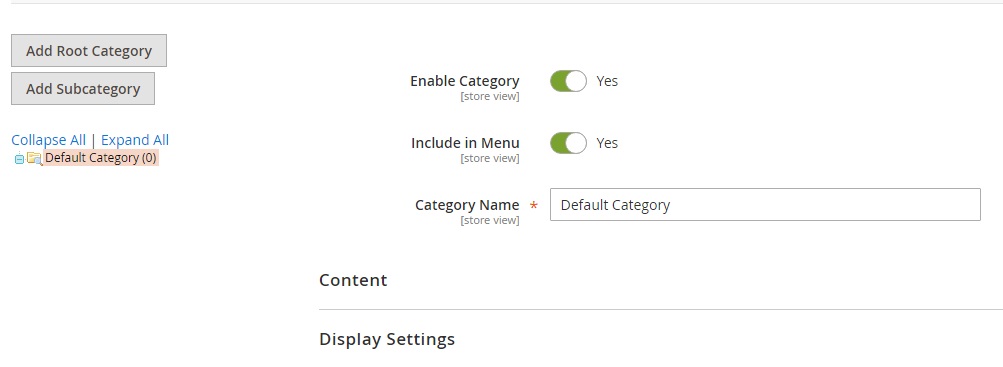
The root category is not displayed in the frontend of the store –that's why your main menu is empty just after is talling Magento.You need to add some new top-level categories (also called subcategories because they are descendants of the root category).
Important:
All categories have to be descendants of the root category. Do not add categories outside of the root category tree.
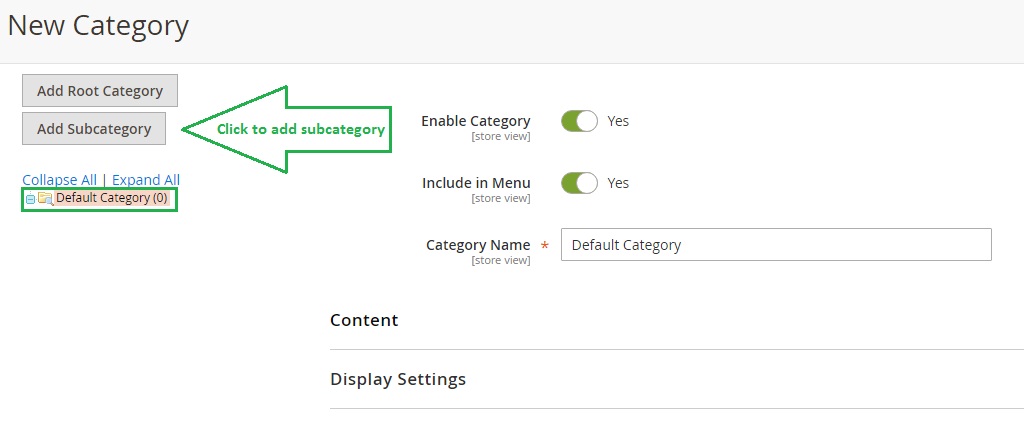
To add a new category,select the root category by clicking on itand click Add
Subcategory button:
Fill inall the required fields. Especialy set Is Active and Include in Navigation Menu fields to Yes, and click Save Category:
Note: that this new category has to be a descendant of the root category– it has tobe one level lower than the root category:
If the category is not displayed in the frontend:reindex the data in System > Index
Management and flush Magento cache.
For each category you can add some basic information which will be displaye don category page (above the products).Navigateto Categories and select a category:
You can show your customers a landing page instead of the standard product listing page when they select the category. You can do so by enabling static block on your category page.Navigate to Catalog > Categories, select a category, open Display Settings tab and select appropriate valuein the Display Mode field.In the CONTENT Block drop-down, select which block you would like to display on category page. The list will include all existing static blocks.
In the main menu you can limit number of displayed cetegory levels. To do that, go to STORES >Configuration >Catalog and specify the dep thin Maximal Depth field. For example, if you want to display only three levels of categories, enter 3 in Maximal Depthfield and save the configuration.From now on,only three levels of categories will be dis played in the main menu.
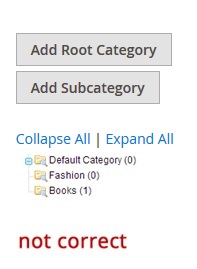
You can display categories in Magento's Layered Navigation block ("Shop by"block) at the top of the left sidebar in category view.To display selected category in the Layered Navigation, go to Catalog > Categories, click selected category and set Is Anchor field(in Display Settings tab) to Yes:
From now on this category will be displayed in the Layered Navigation.If the category is not displayed in the frontend: reindex the data in System > Index Management and refresh Magento cache.
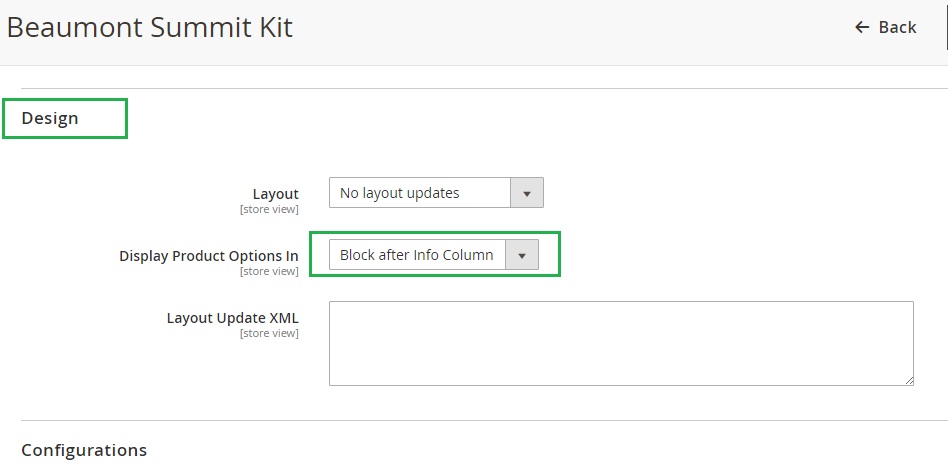
For products which have options (like configurable productsor bundle products) you can change position of the options box on product page. It can be displayed in the main column(next to the product images),or in the column below images.Select a product in PRODUCTS > Catalog,open Designtaband select position in Display Product Options Infield:
There is a quantity indicator displayed on the product page.It shows the quantity of items left in stock if the stock level is equal or below the threshold specified in the admin panel. The threshold can be set in Only X left Threshold
field in STORES >Configuration >Inventory.
For example, if you set the option to 20,all products with quantity equal or less than 20 will have the text Only X left on the product page.
For configurable products this
text is click able and shows drop-downbox with quantities of all products associated with that product.
An attribute in Magento is defined as any property of a product,such as color,price,SKU, manufacturer, etc.There are two types of attributes: System Attributes (cannot bedeleted and every product must contain them) and Simple Attributes(which can be created by the store admin).Attributes are groupped in AttributeSets. Here youcan find more info about Magento attributes:
To edit existing attributes, go to STORES > Attributes> Product and select an attribute from the list.To create a new attribute,click Add New Attribute button.There are many types of attributes which you can create,one of the most useful is a dropdown attribute which lets you define a list of values that will be available when creating new products.
Important:
After making any changes in the attributes and AttributeSets,you may need to reindex the data in your Magento (3.2 Index management)and flush the cache (3.1 Caching system).
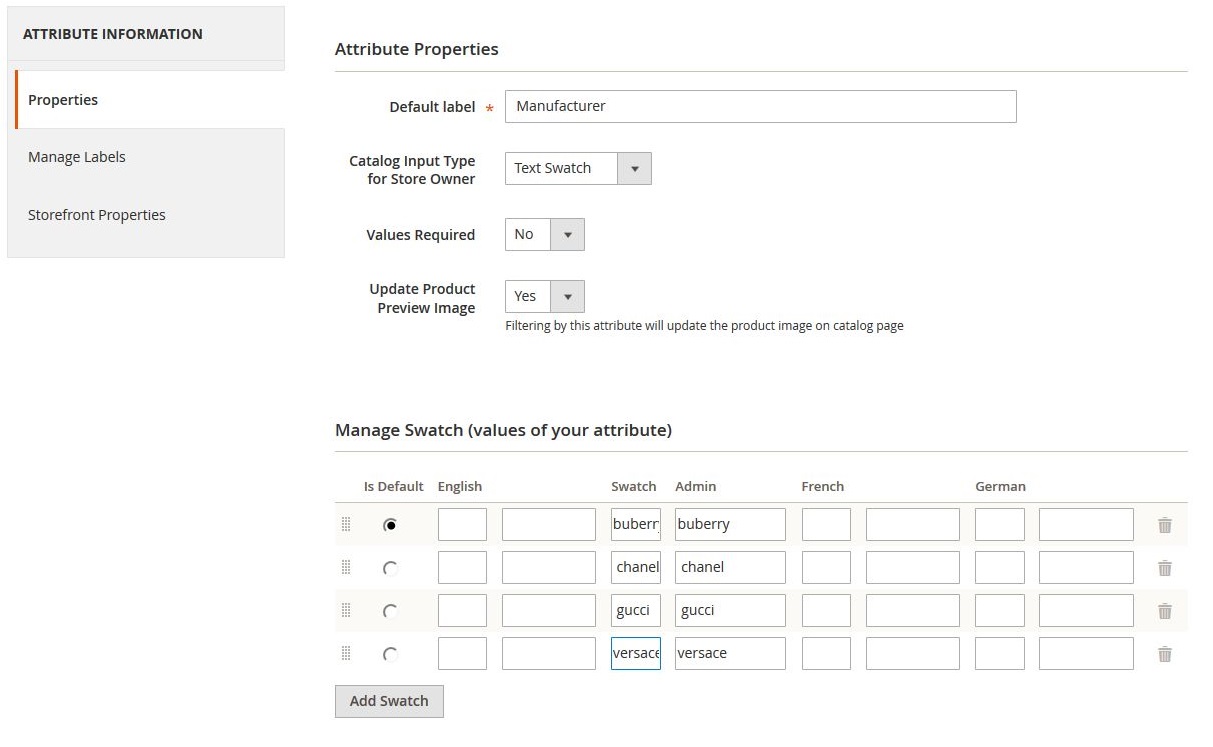
Let's see an example
of a dropdown attribute manufacturer which stores a list of product brands.Fill in the form as follows:
After you create the attribute, you need to add it to the Attribute Set which you use for your products.Attribute Sets are described in the next chapter.
An Attribute Set is a collection of attributes, created to fit certain types of products. To add a new product in Magento you need to select an AttributeSet which will describe that product. You can create many custom Attribute Sets for different types of products.For example, if you sell t-shirtsand books,you could create 2 AttributeSets:one specific to t-shirts,one specific to books.The Attribute Set for t-shirts can include attributes such as color and size (which are not needed in the AttributeSet for books).
Important: After making any changes in the attributes and AttributeSets, you may need to reindex the data in your Magento (3.2 Index management)and flush the cache (3.1 Cachingsystem).
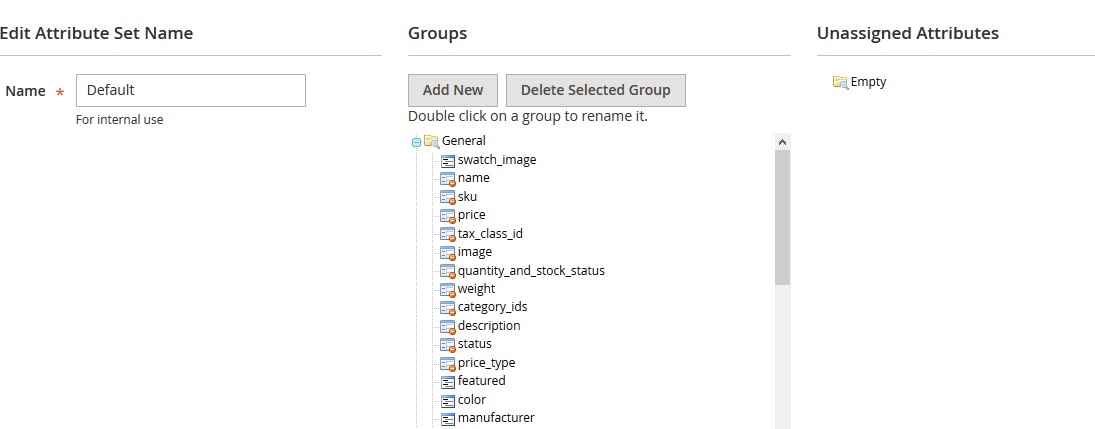
Let's continue an example
with manufacturer attribute. To add your attribute toan AttributeSet,go to Catalog>Attributes >Manage Attribute Sets,select an Attribute Set (default one is named Default). You will see Unassigned Attributes section with
a list of available attributes.You can associate attributes to your Attribute Set by clicking and drag in an attribute in to the Groups section.To disassociate an attribute,simply drag it back to the Unassigned Attributes
list.
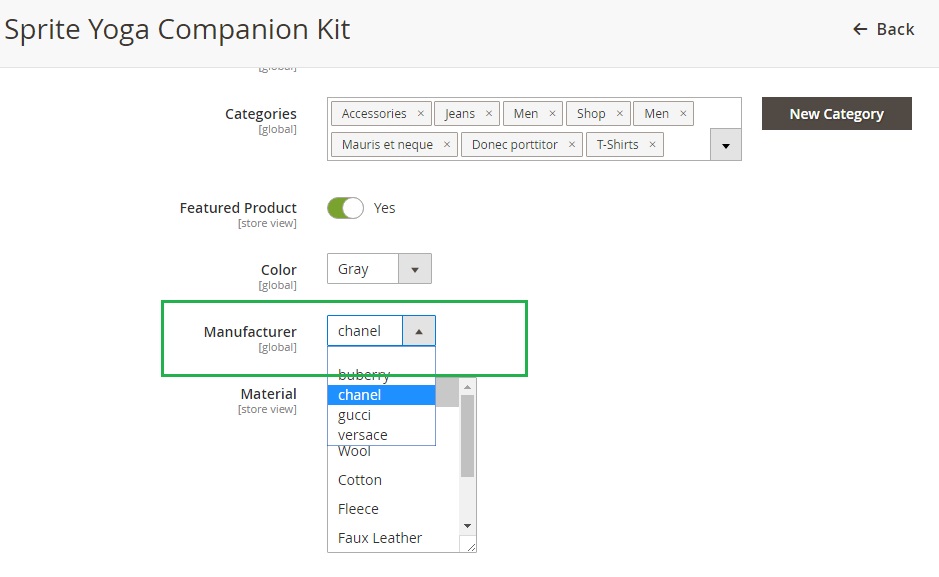
Click Save Attribute Set button after you finish. You can add your custom attributes to many AttributeSets. < Then,go to PRODUCTS> Catalog and open a product.If the product is based on the Attribute Set which contain your manufacturer attribute, you will see a list of manufacturers which may look like this:
If you added manufacturer attribute to that AttributeSet, but you don't see the field with the list of manufacturers, you may need to reindex the data in your Magento and flush the cache.
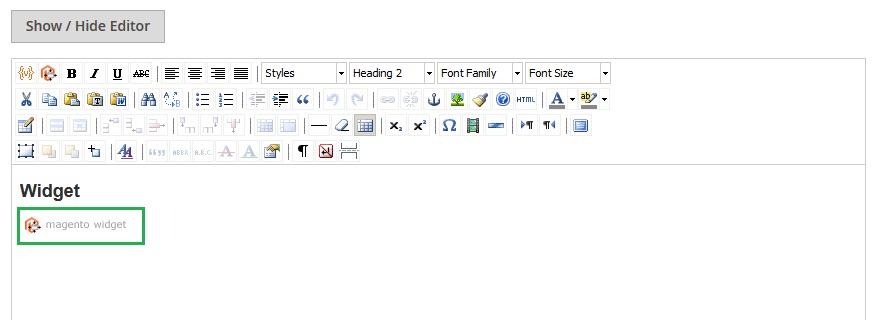
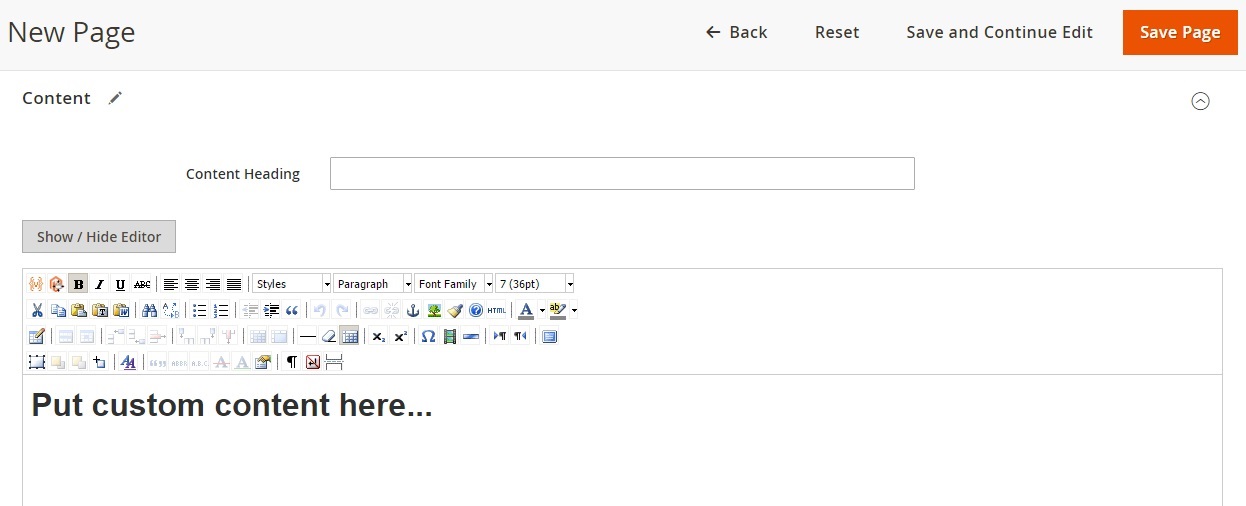
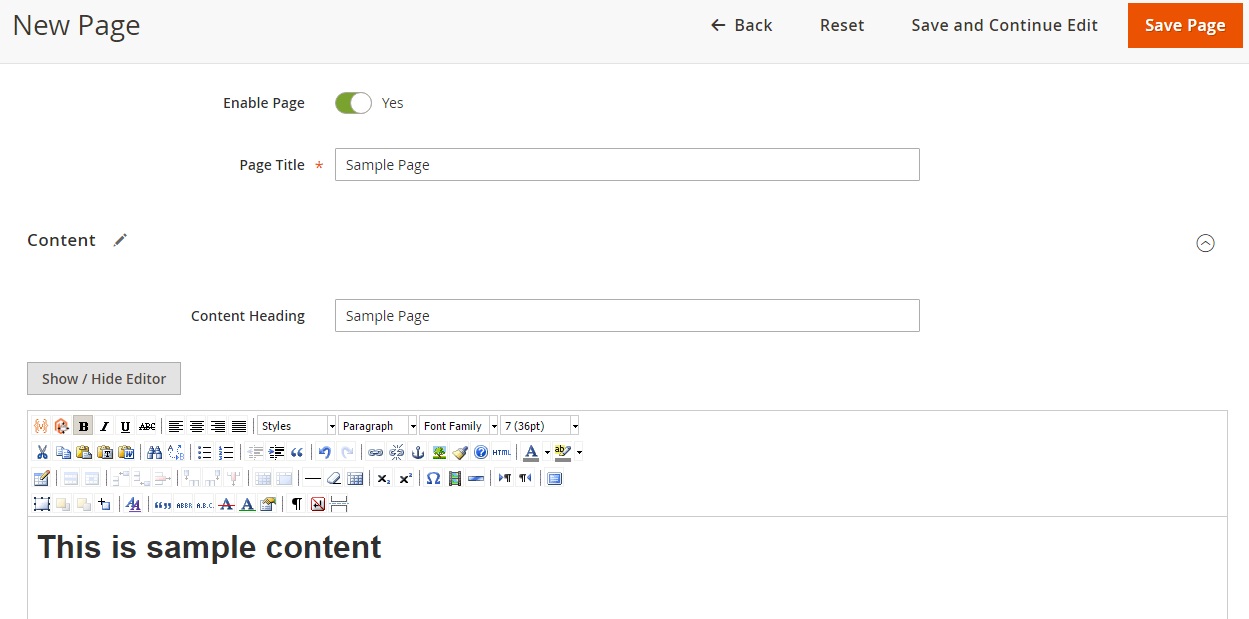
WYSIWYG(What You See Is What You Get) editor is a convenient way to add content to pages and static blocks in Magento.
Important: WYSIWYG should only be used to edit text, never use it to edit HTML. Remember to always turn off WYSIWYG editor when you want to edit HTML or Magento's CONTENT tags in the page/block content.Otherwise WYSIWYG
editor can break your content.
Infact the best way to useWYSIWYG is to turn it on only when it is needed. Go to STORES >Configuration >Content Management and set it as Disabled by Default.
After that, if needed, WYSIWYG
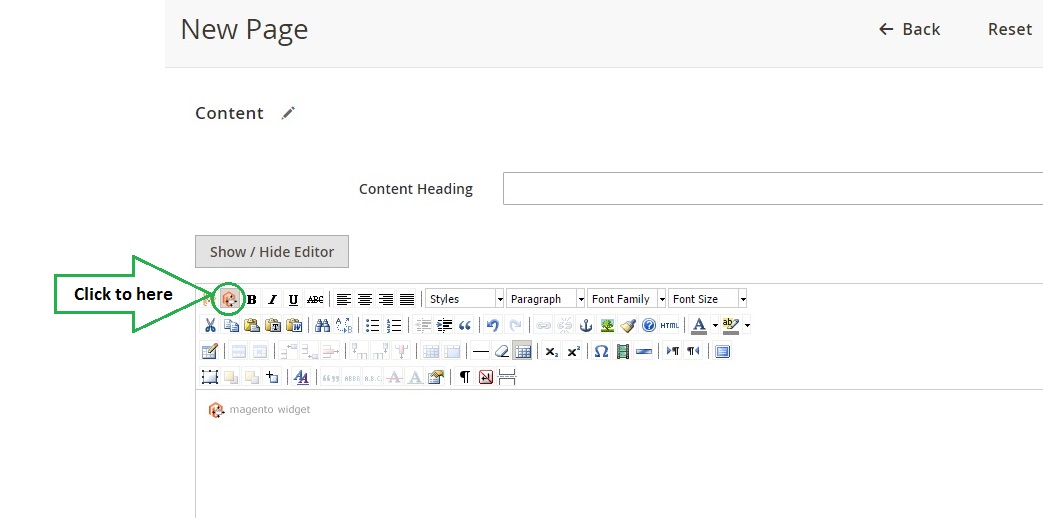
can always be turned on with Show/Hide Editor button above the page/block content field:
Static blocks in Magento are simple portions of content that can be displayed throughout the site. To manage static blocks, go to CONTENT >Blocks section in the admin panel.
To create a static block,go to CONTENT > Blocks,click Add New Block button and follow these steps:
For more details on creating static blocks please refer to Magento user guide: static blocks.
There are some special mark up tags– a bits of text surrounded by double curly braces– which have a special meaning in Magento.You can use those tags either in static blocks or CONTENT pages. For example,this tag:
{{storeurl=''”}}
will be replaced with the store’s base URL. It might be useful when you want to display a link on one of your pages.You can use this tag to dynamically build all of your links (you don't need to hard-code
any links).Thanks to that you will not need tore build your links after you move your store to a new domain. For example, if your store domain is www.example.com, the following tag placed in the page content:
{{storeurl='path/to/page/about-us'}} will be replaced with this URL:
http://www.example.com/path/to/page/about-us/ For more information, please refer to this article, where you can find a comprehensive list of available tags: CONTENT markup tags
This theme introduces a few additional interface character strings. For example “Special Price” label is replaced with shorter “Now only” label. Strings are located in app/design/frontend/Alothemes/default/i18n/en_ES.csv
Example:
To translate the interface into Spanish follow these in structions:
You can edit content in path file: app/design/frontend/Alothemes/zella/Magento_Newsletter/templates/subscribe-popup.phtml
You can config in STORES > Configuration > ALO Themes > Newsletter Popup
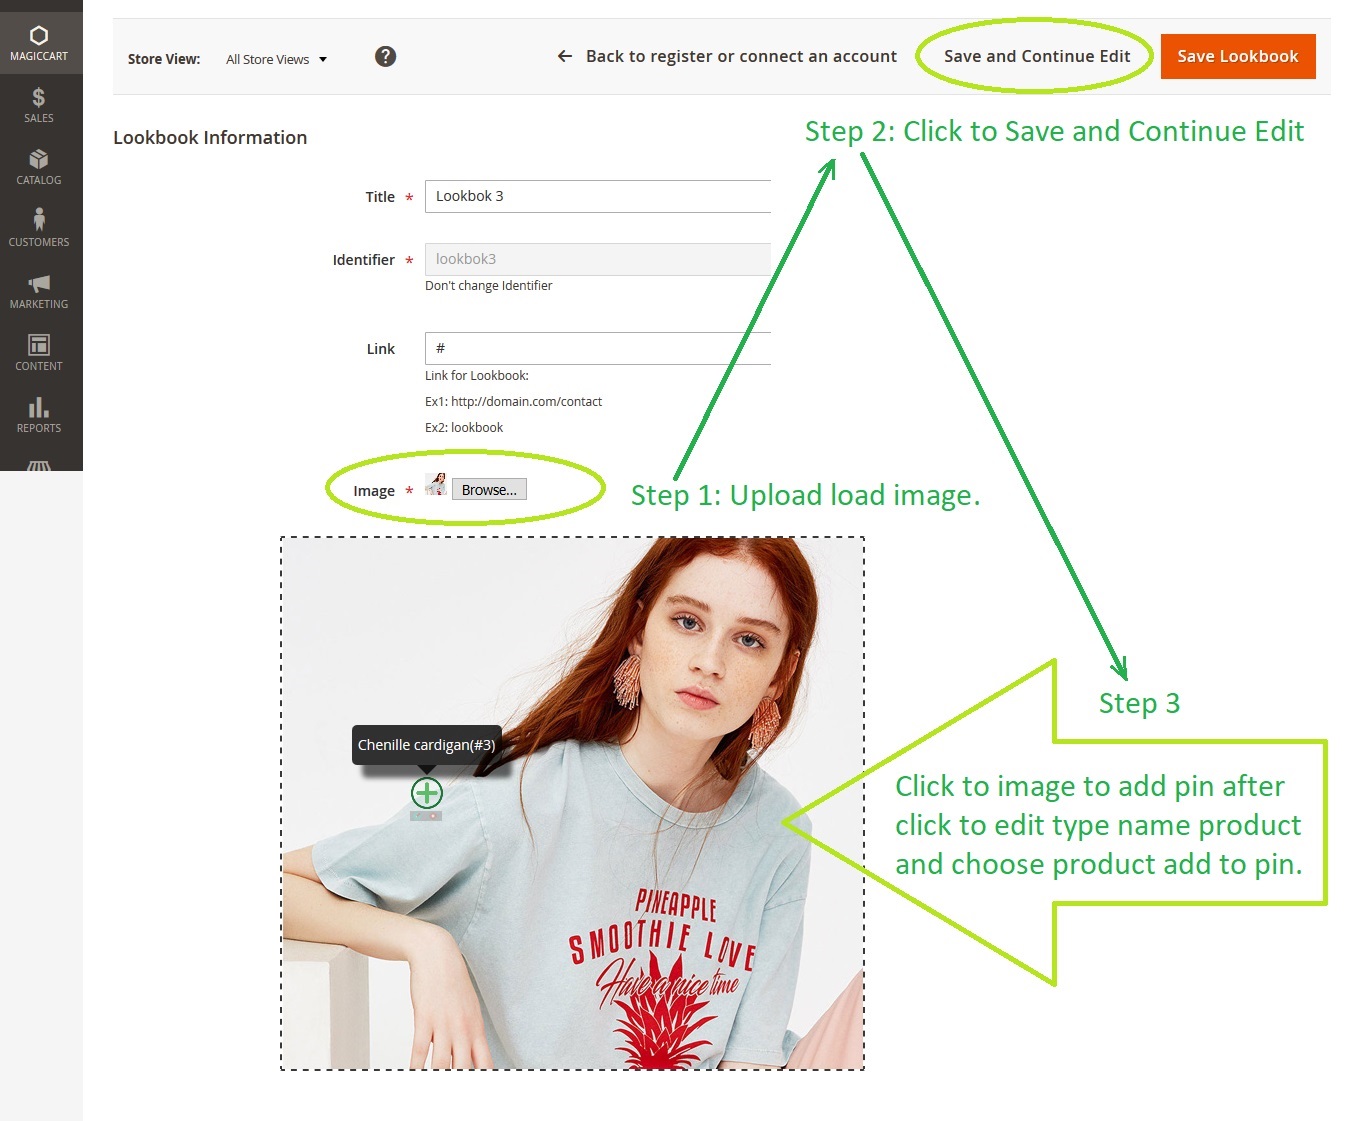
Widgets are the most exciting features in the magento. You can use that to display different content block within your page, such as Latest Products/New Products/Best Seller Products or any CONTENT Block.
widget icon in CONTENT page or in static block:
While you double click to widget it will show option of widget
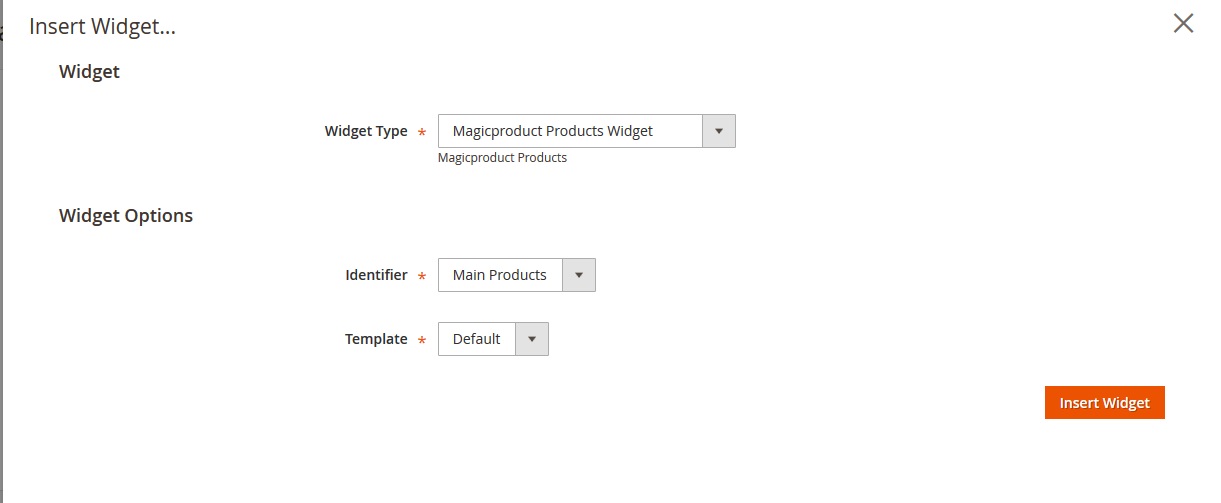
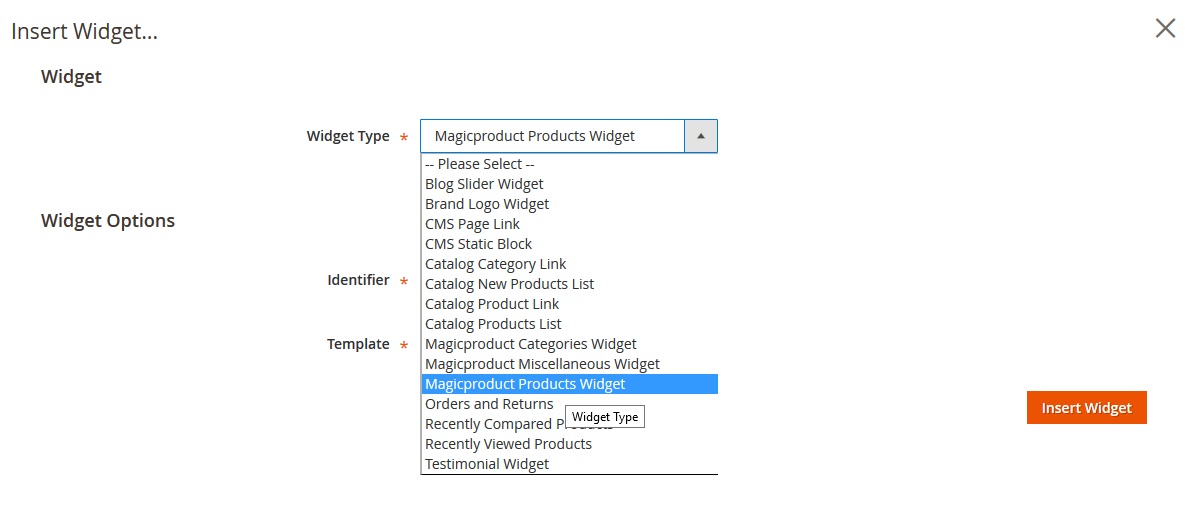
Example with Magicproduct Widgets:Our extensions in theme based on the widget it is inserted into the page or static block. If you want to change the configuration you can find it in the page or static block and change it.
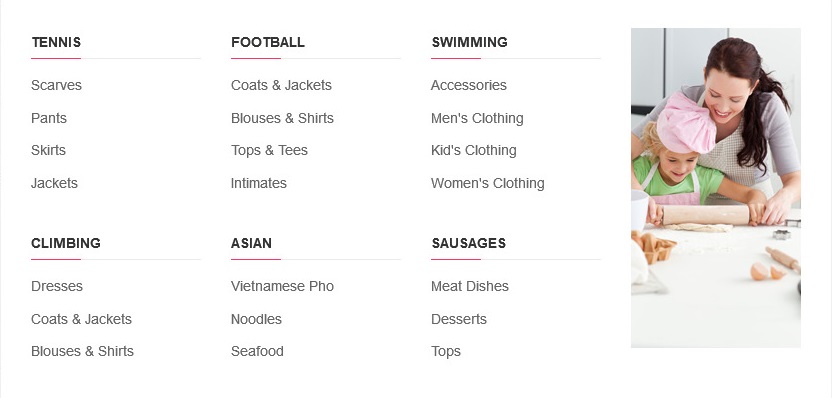
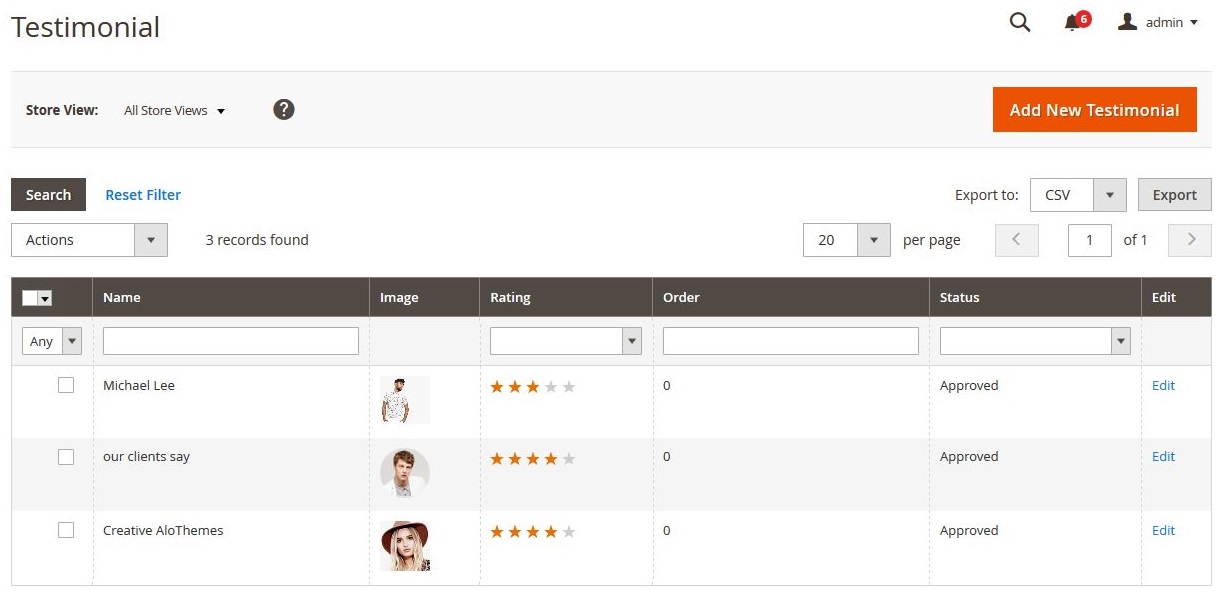
We have add the widget in our theme as Facebook Fanbox Widgets, Latesttweet Widgets, Shopbrand Widgets, Magicproduct Widgets, Categories Widgets , Magicslider Widgets, Testimonial Widgets
In this chapter you can find description and configuration details of selected elements of this theme, such as home page, built-instatic blocks, CSS classes etc.
Note:
This list of all settings available in the System > Configuration section of the admin panel can be found in the next chapters.
- Positions all block static (Admin > CONTENT > Block ) and Modules ( Admin > Magiccart ) in homepage.
After the theme is installed, you can import sample versions of the home page.
To manage pages in Magento, go to CONTENT > Pages section. By default in Magento a page with URL Key home is displayed as the store’s home page. One of a few sample home pages which you can import, has the following URL key: look-home-page. So to display that page as a home page in your store, you need to change its URL key to simple home.
Note: If the page with that URL key already exists (which is true in most of Magento installations) you will need to delete existing page or change its url key. Alternatively you can indicate which CONTENT page you want to use as your home page. To do that, go to STORES > Configuration > General > Web > Default Pages tab and select the desired page in the CONTENT Home Page field.

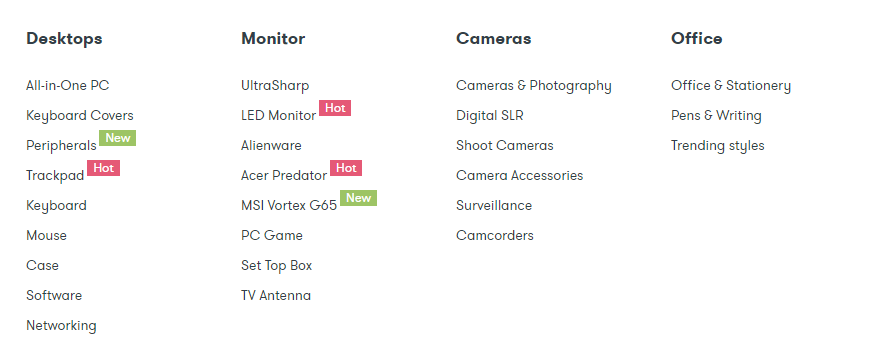
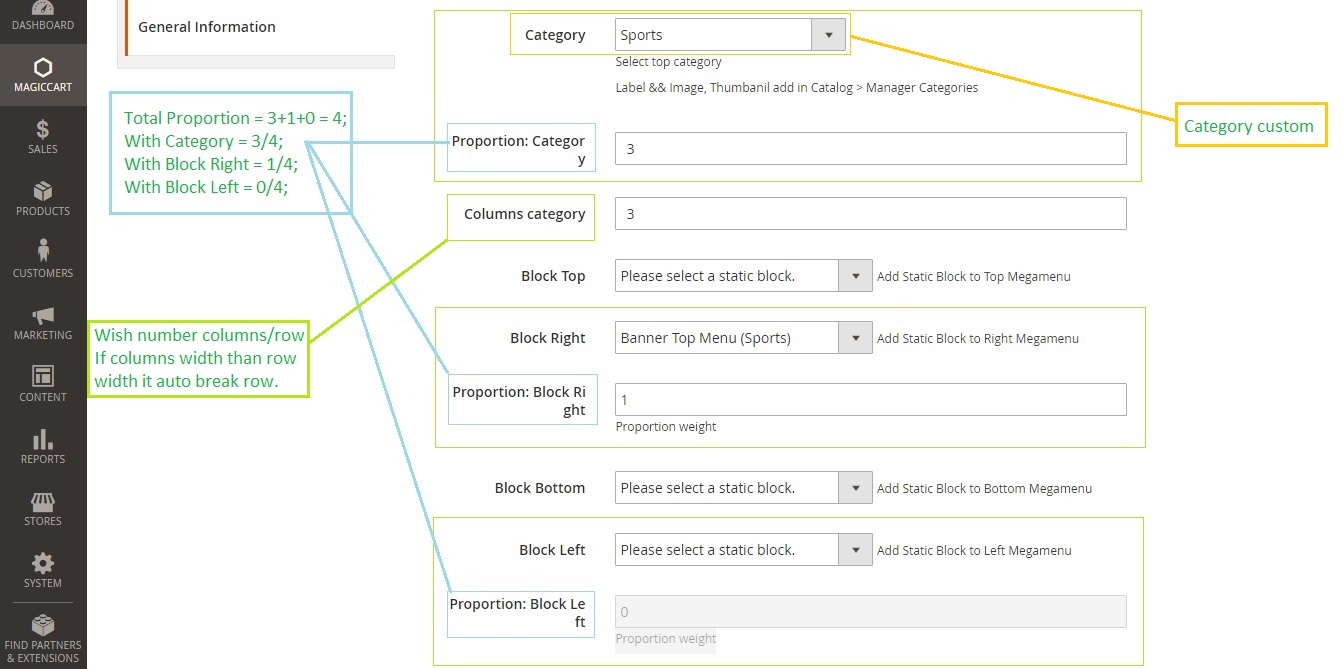
1.1.1 Type Mega menu
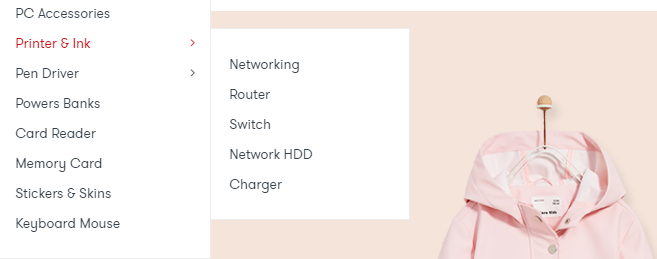
1.1.2 Type Dropdown menu
1.2.2 Menu
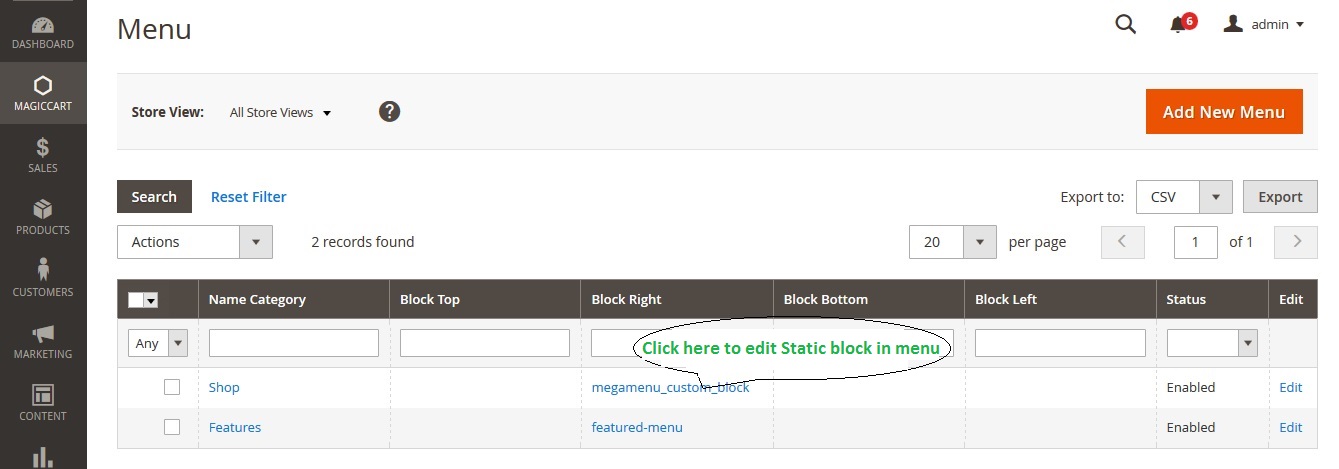
You must log in Admin > Magiccart > Magic Menu > Menu. It might look like this:
You can Add New or edit. after that, click save to finish.
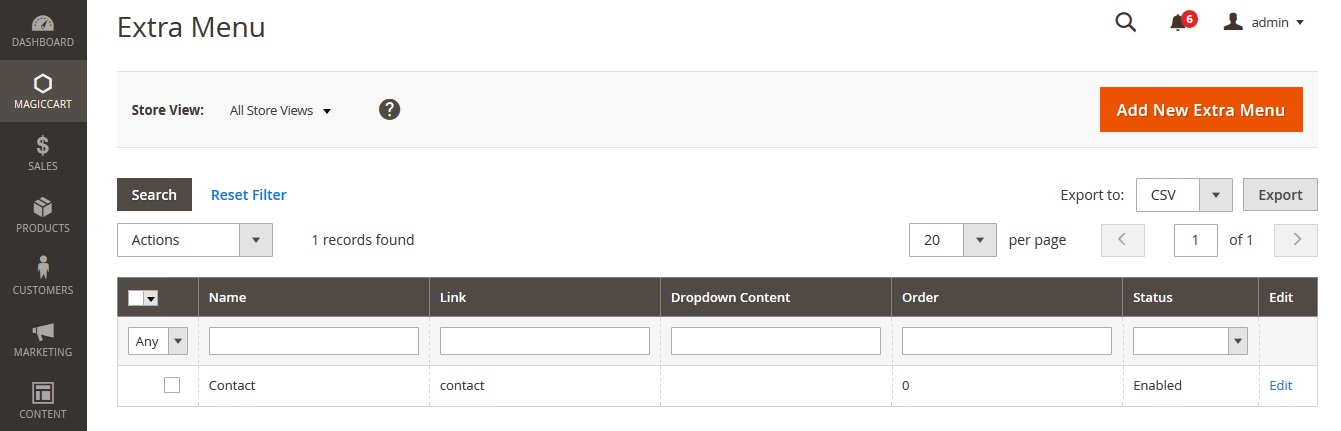
You must log in Admin > Magiccart > Magic Menu > Extra Menu. It might look like this:
You can Add New or edit. after that, click save to finish.
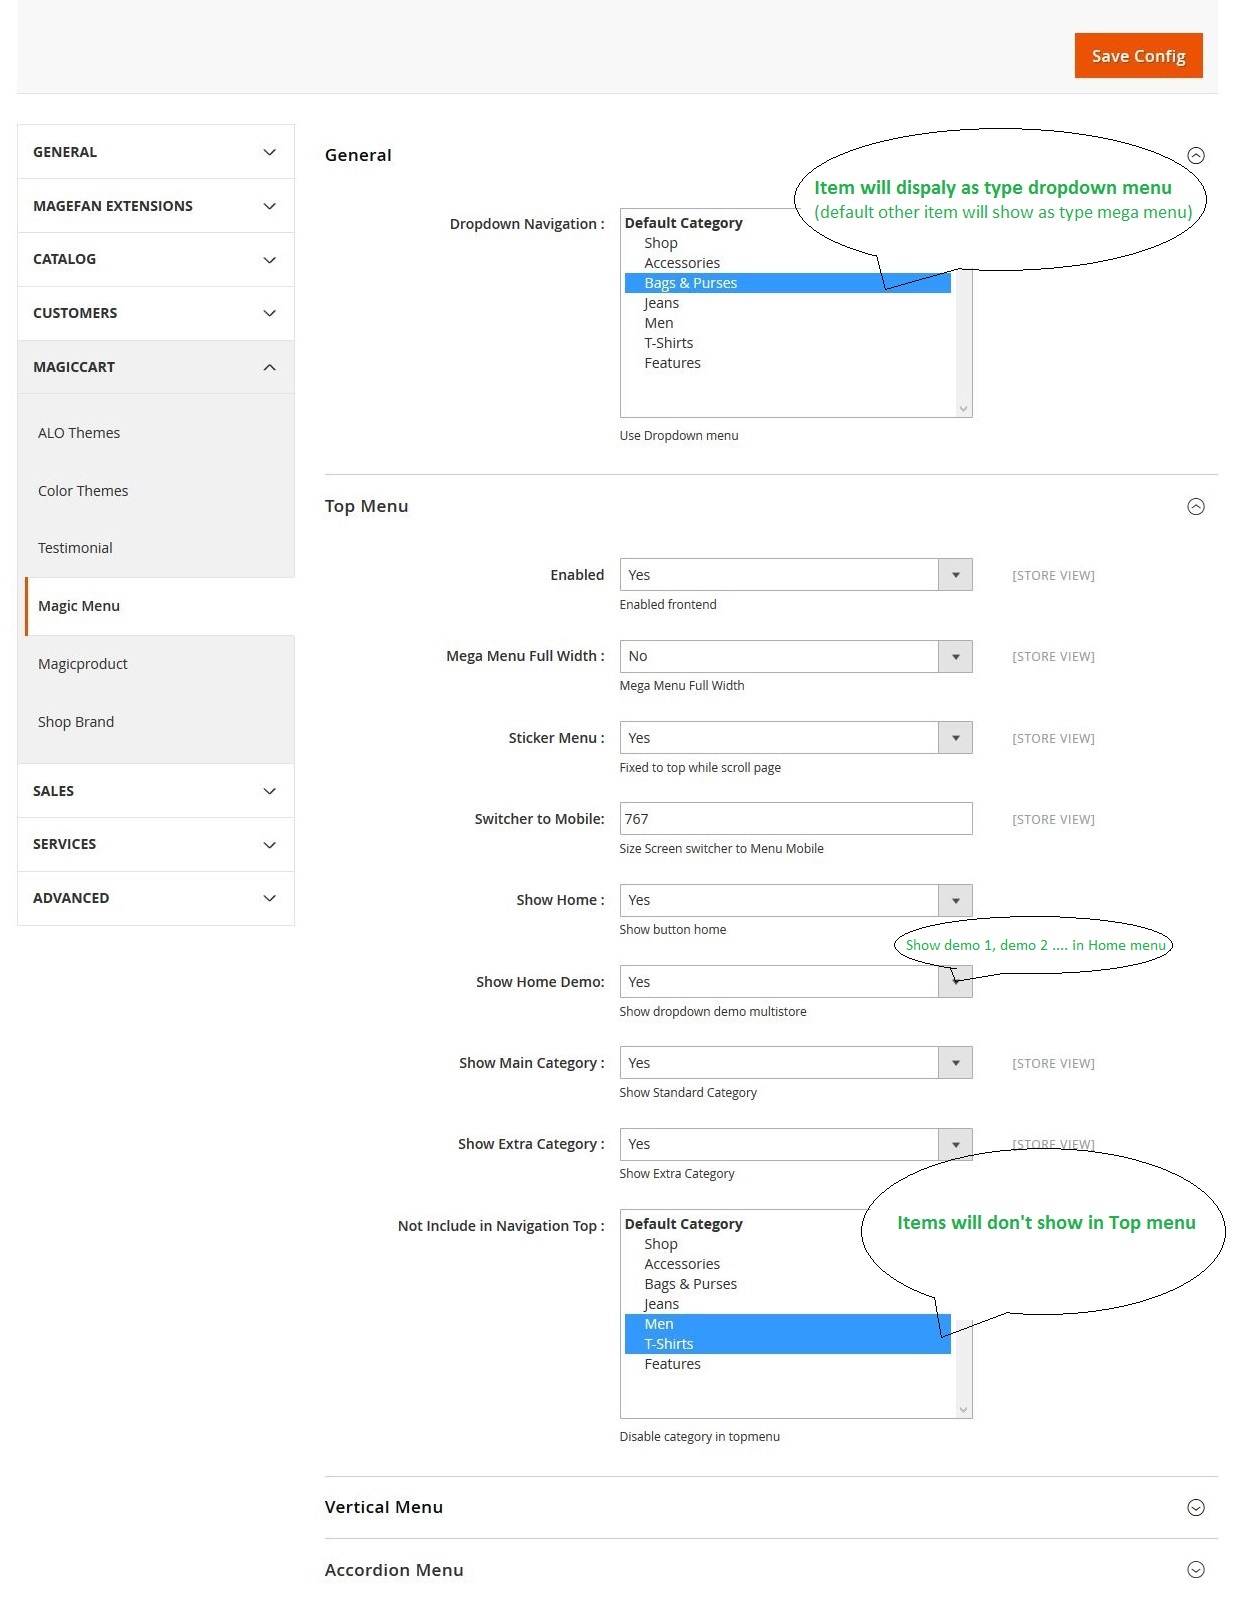
You must log in Admin > STORES > Configuration > Magic Menu to config. It might look like this:
You can change settings or edit. after that, click save Config to finish.
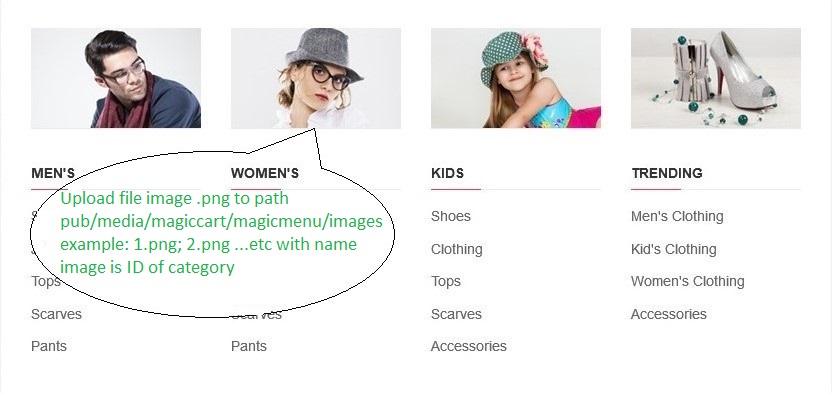
Example 1: Add image to category(only for level 2)
Upload file image .png to path pub/media/magiccart/magicmenu/images
example: 1.png; 2.png ...etc with name image is ID of category
How to get ID of category?
You go to Products > Categories => choose category and get it as image below:
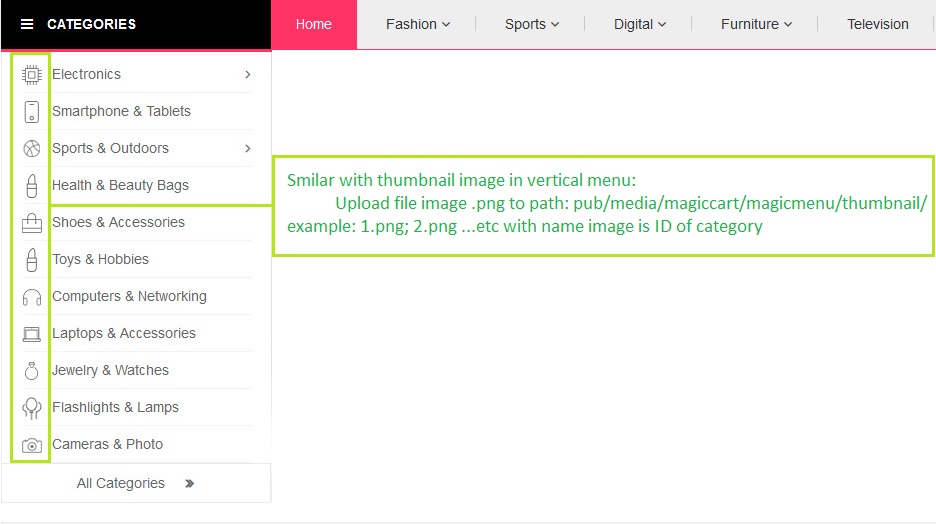
Example 2: Add thumbnail to category(only for level 1 of vertical menu)
Upload file image .png to path pub/media/magiccart/magicmenu/thumbnail
example: 1.png; 2.png ...etc with name image is ID of category
How to get ID of category?
You go to Products > Categories => choose category and get it as image below:
Example 1: Add block to right menu
Go to Magiccart > Magic Menu > Menu > Add New Menu => Choose Menu want to custom and config as example blow:
Frontend:
Example 2: Add block to bottom menu:
Go to Magiccart > Magic Menu > Menu > Add New Menu => Choose Menu want to custom and config as example blow:
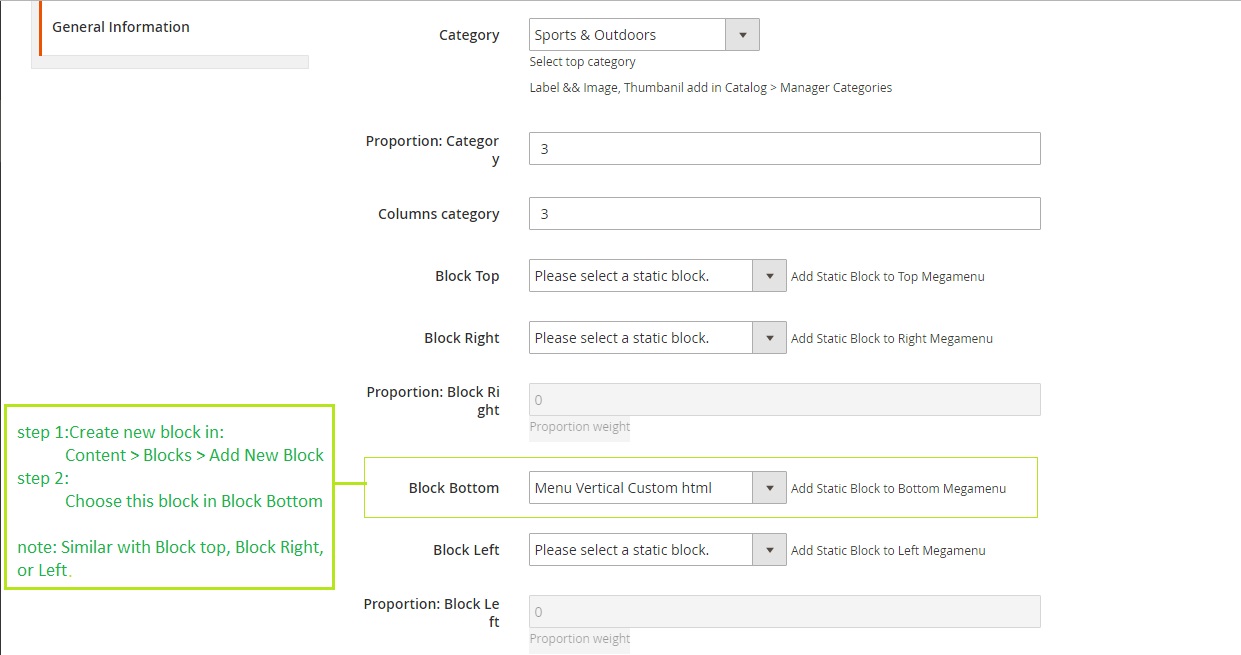
Frontend:
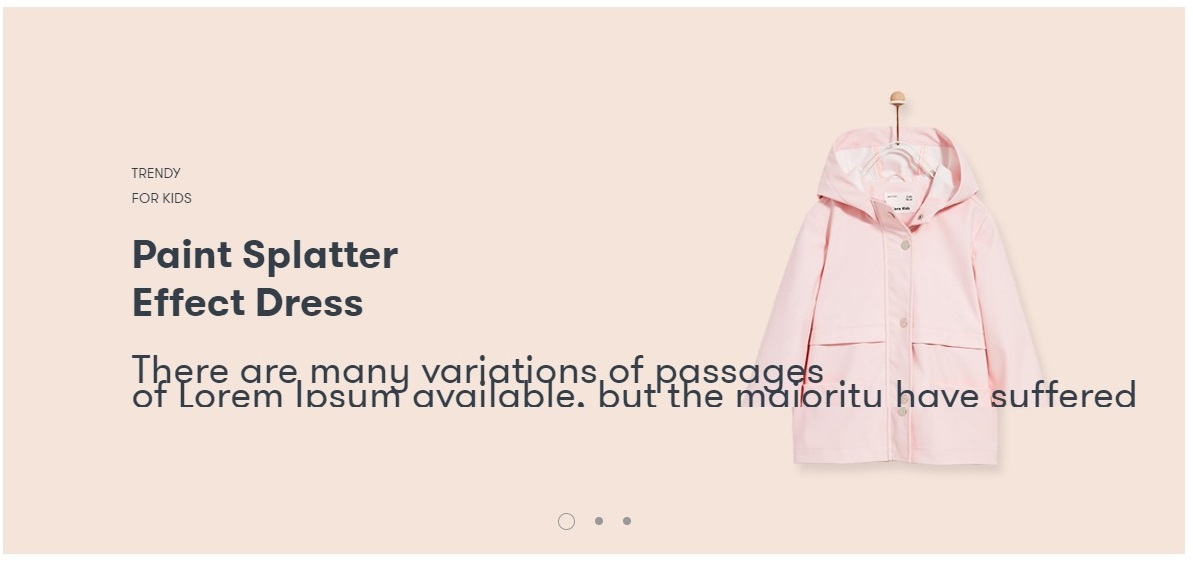
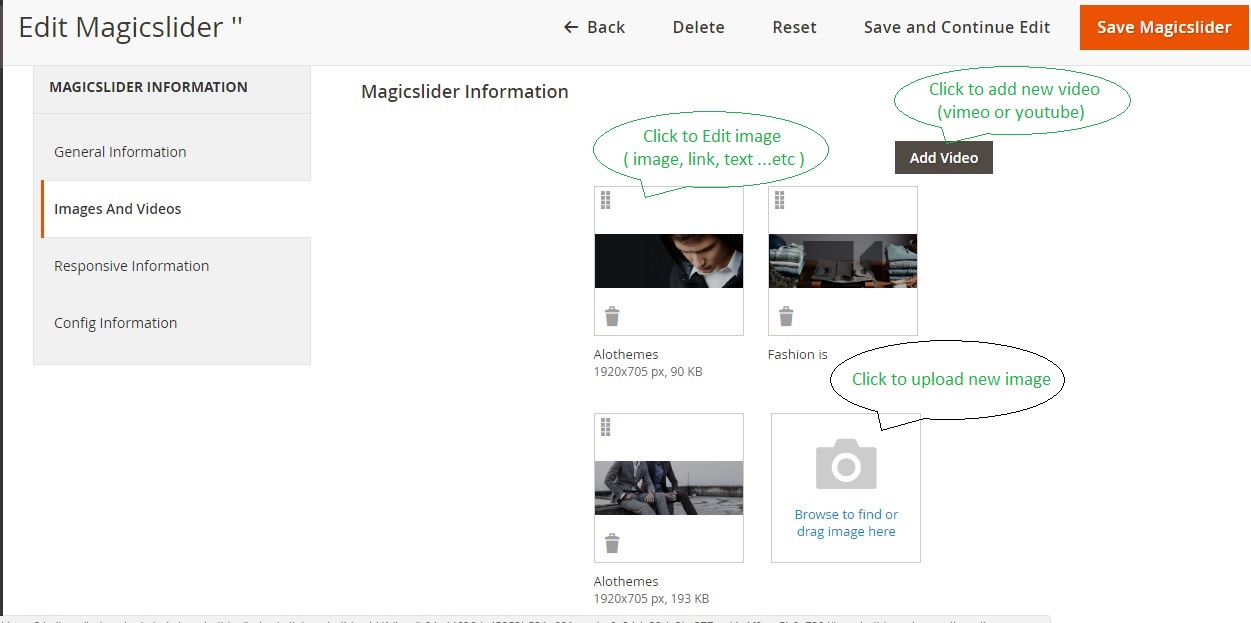
2.2.1 Add New Slider
You can add or edit slider in Admin Panel > Magic Slider > Slider
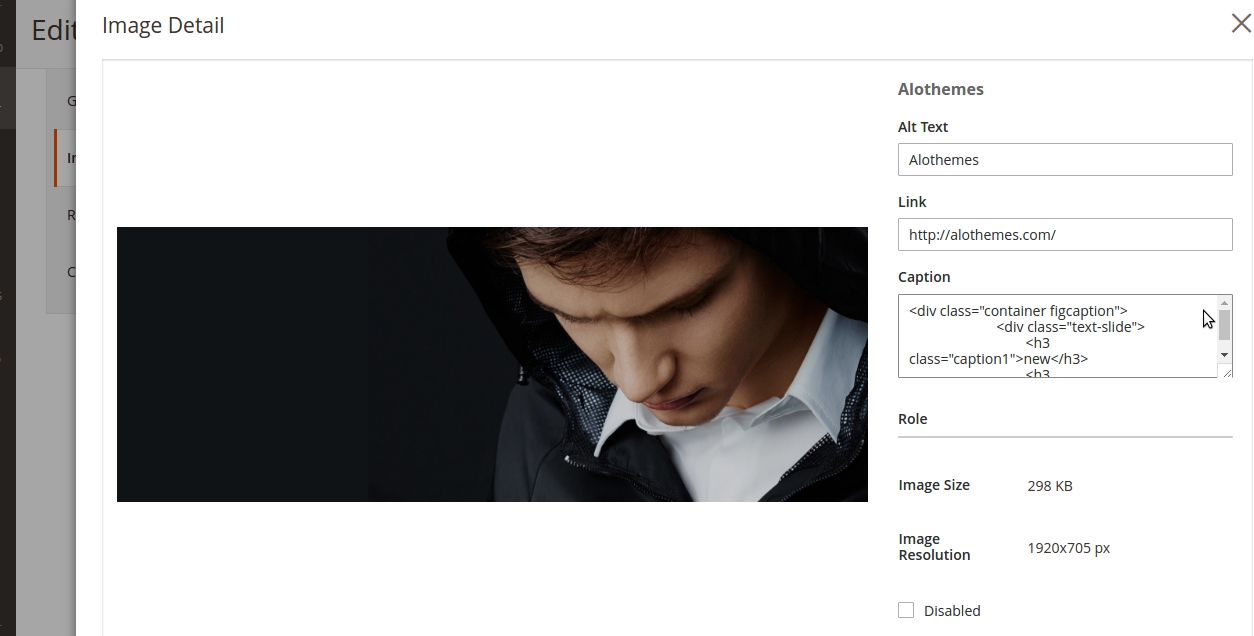
2.2.1 Add or edit info image
You click to image popup show as below you can change it.
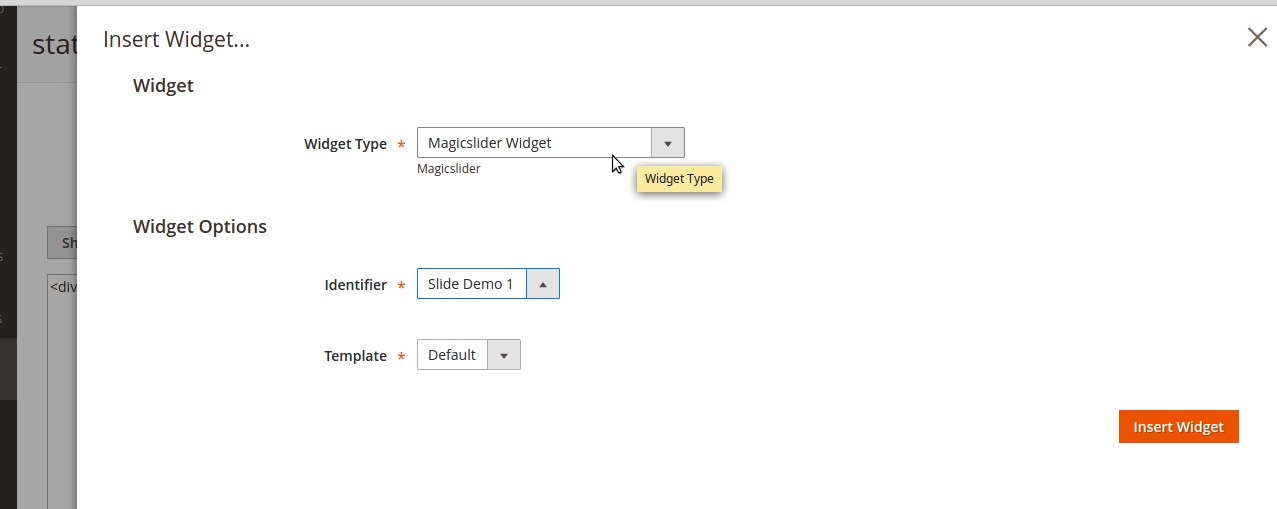
After creat new slider you can go to Content > Pages or Content > Blocks after clik to Inser Widget and choose Slider as image below.
The following chapter describes some of the basic Magento settings and features. Please note that as authors of this theme we provide support only for the issues related strictly to the theme. Support for Magento configuration/ installation/ maintenance etc. is beyond the scope of our support. This chapter should be only treated as a starting point, more information about Magento can be found in Magento documentation : Magento help
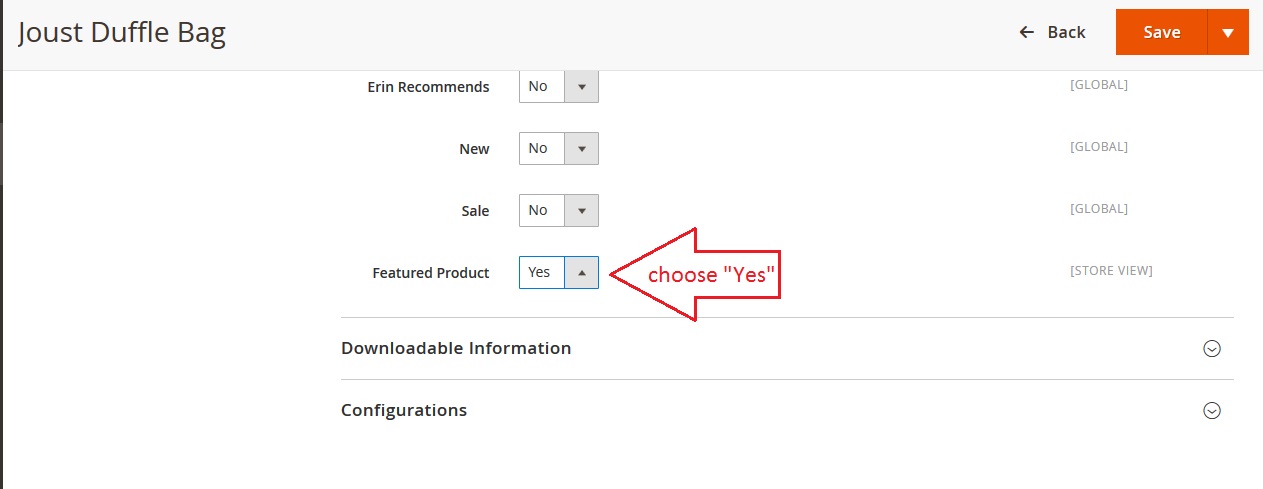
Catalog >Products > Edit >General >Featured Product >Yes > as Config as image below.
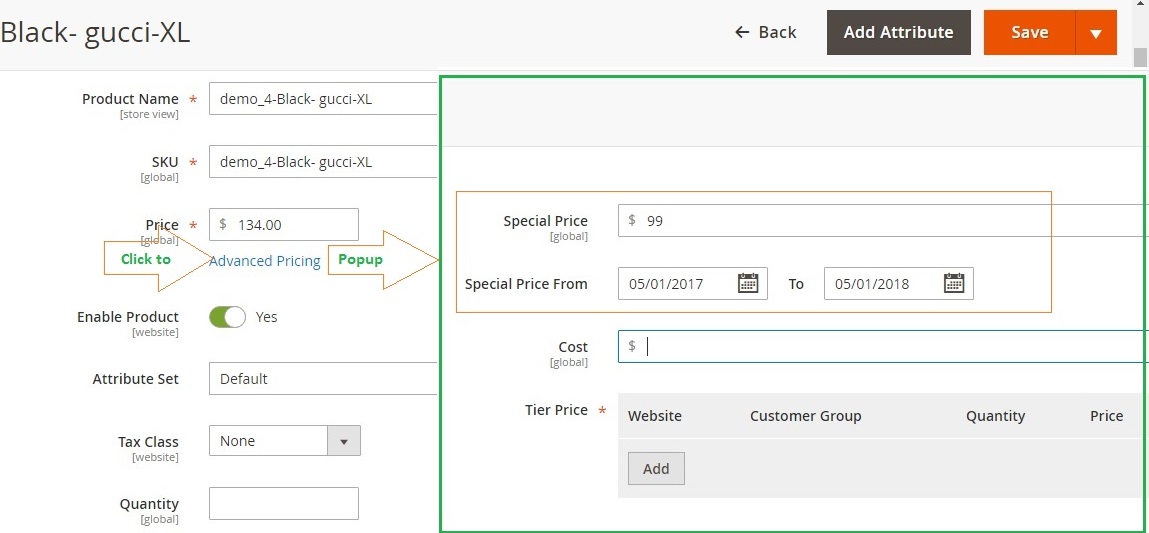
Catalog >Products > Edit >Advanced Settings >Advanced Pricing > set Config as image below.
Catalog >Products > Edit >Advanced Settings >Autosettings > set Config as image below.
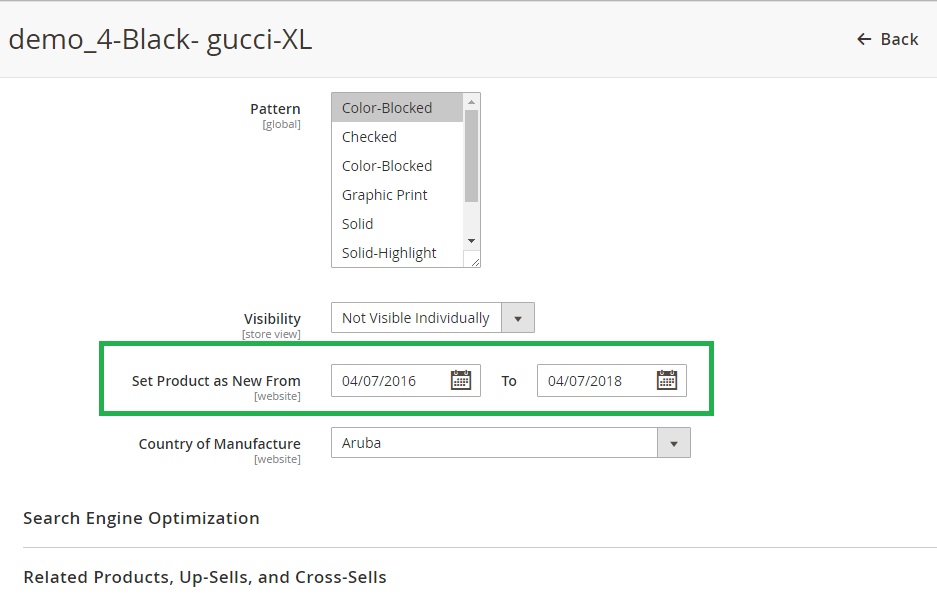
Latest Products auto filter follow Id of product sort DESC.
Note: Latest Products different new products.
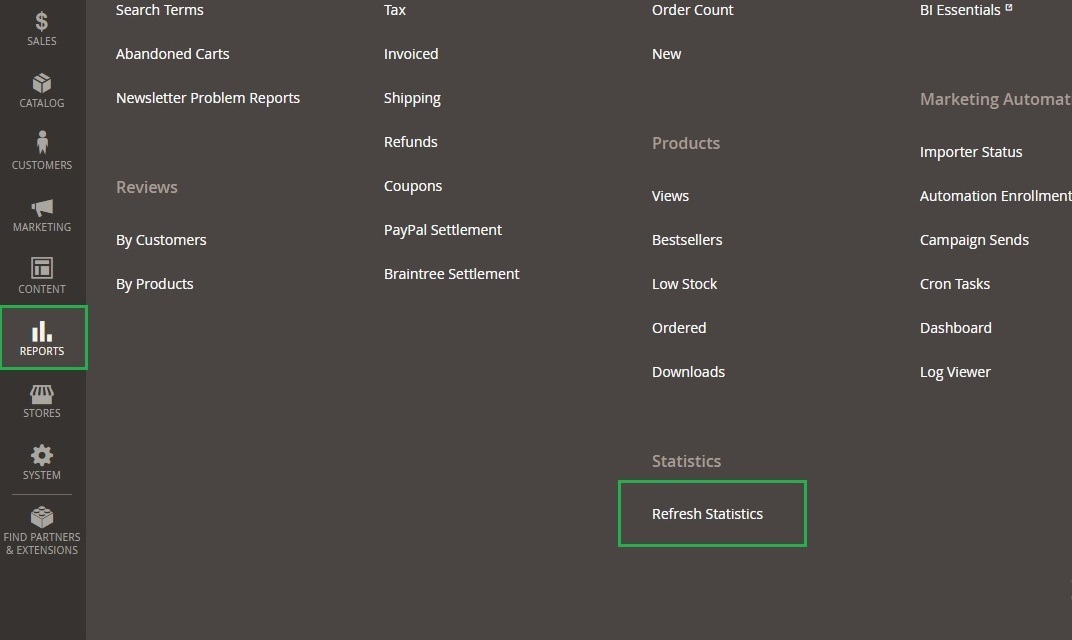
Reports >Statistics >Refresh Statistics > Refresh all Statistics in this section..
Note: Bestseller Products filter follow number order of product and sort DESC so you need checkout and place order with new site after Refresh all Statistics..
Random products will auto get random products in your database..
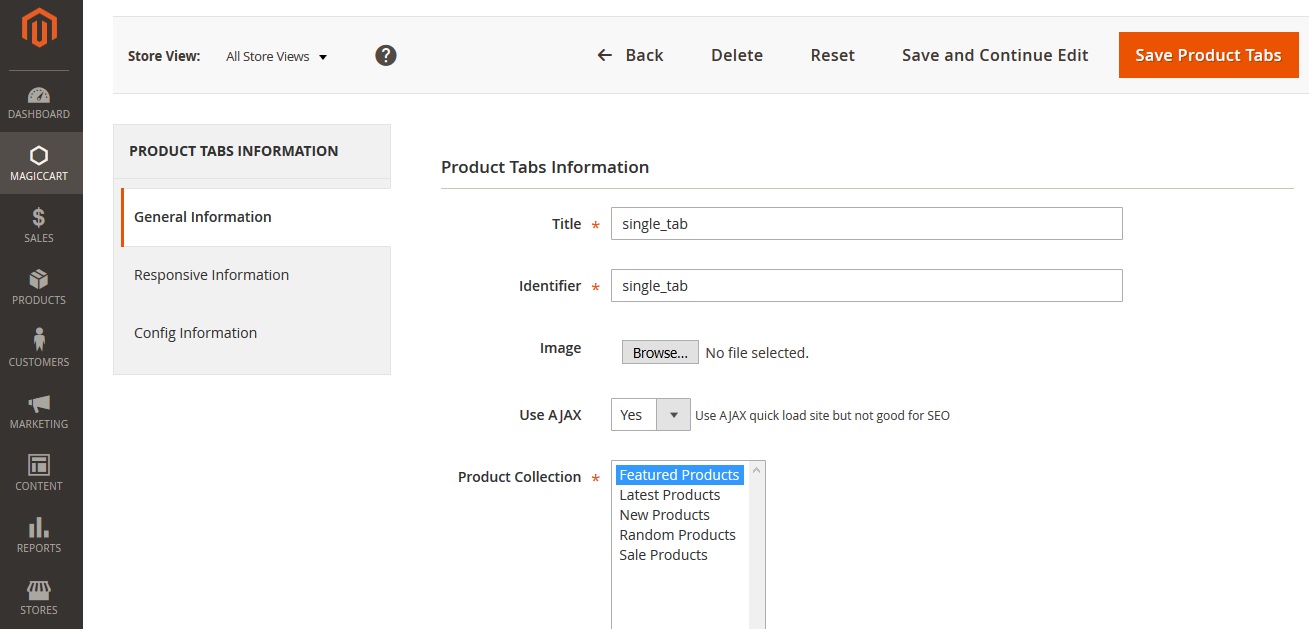
Magiccart >Magic Product > Product >Add New Product Tabs > set Config as image below.
				Note Step 1:
				Tab "General Information": Config General.
				Tab "Responsive Information": Config with template responsive.
				Tab "Config Information": Config Slide or Grid.
After the successful create Product Tabs in step 1 you can show it in pages or block
Example show Widget product in home page:
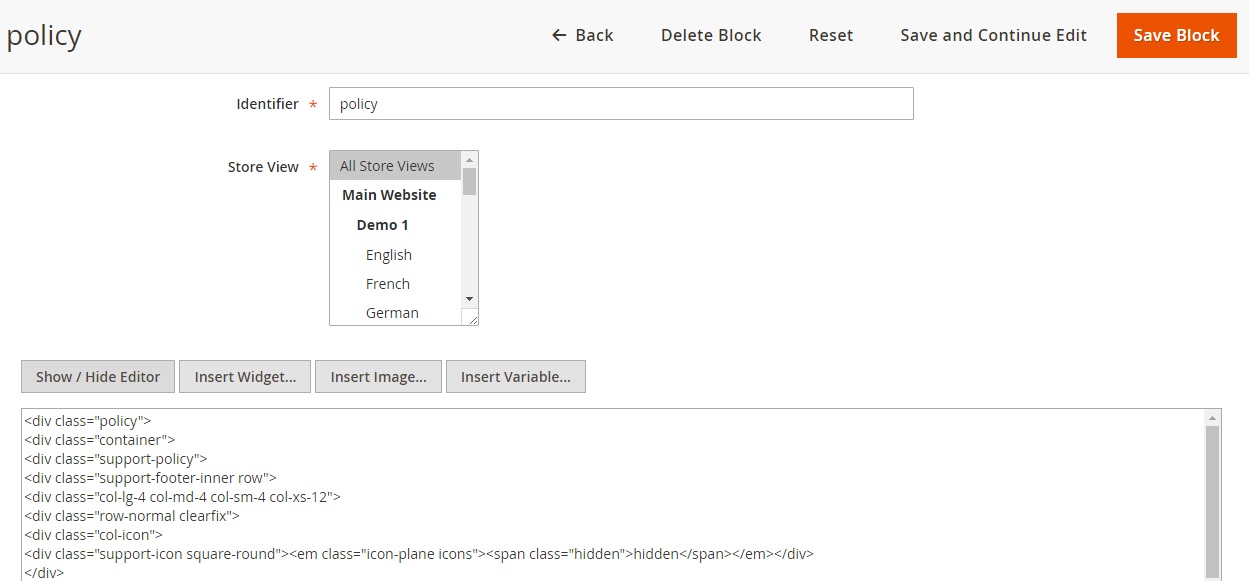
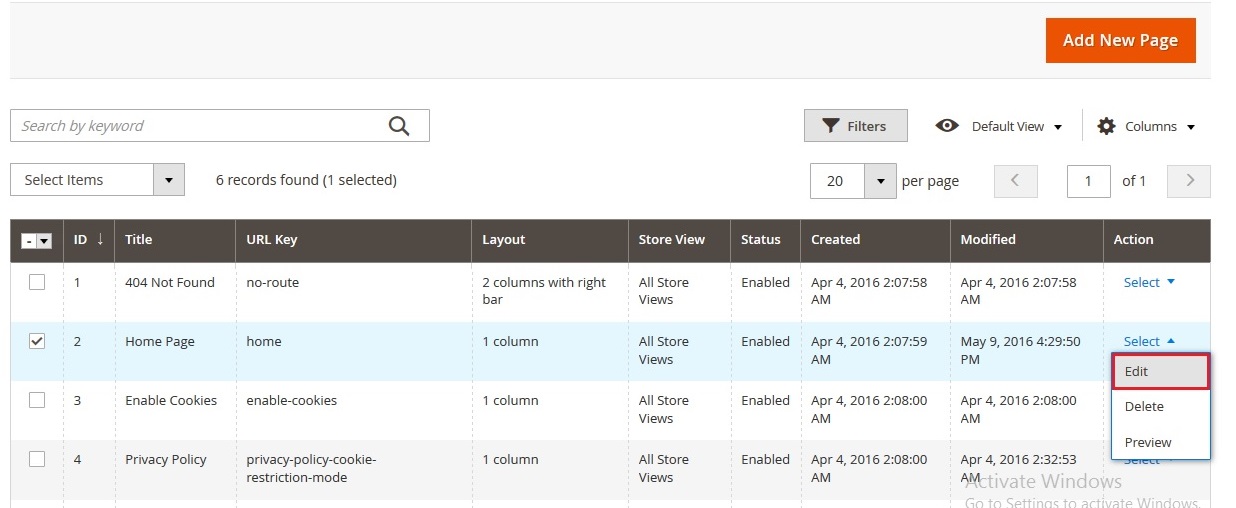
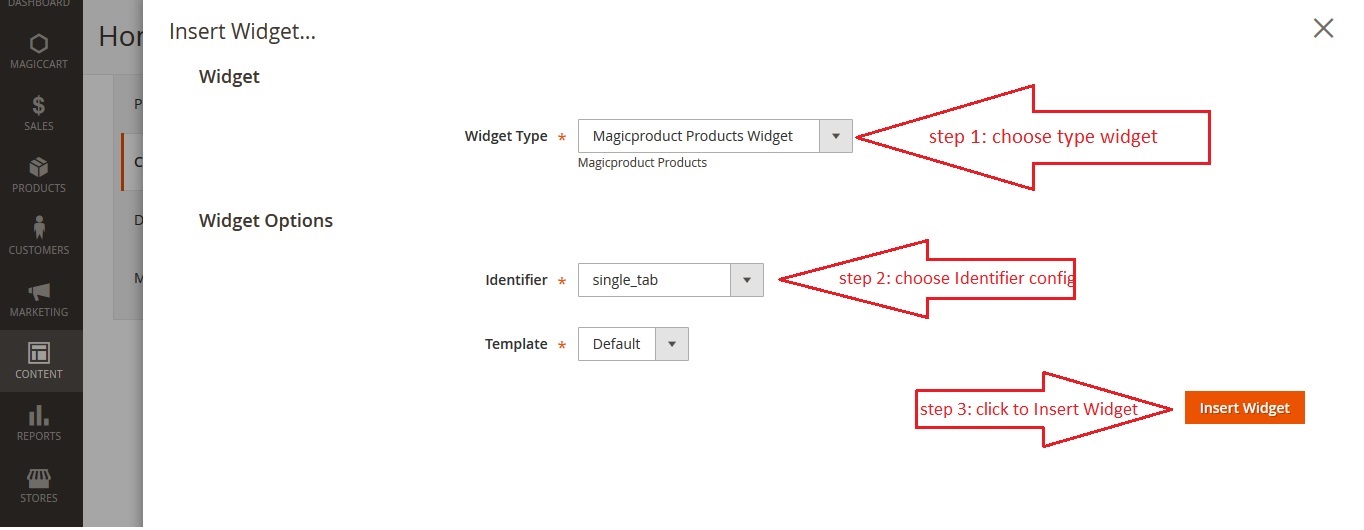
1. Now you go to CONTENT >Pages >>home > Edit > as image below:
2. Click to icon widget:
3. Insert Product widget:
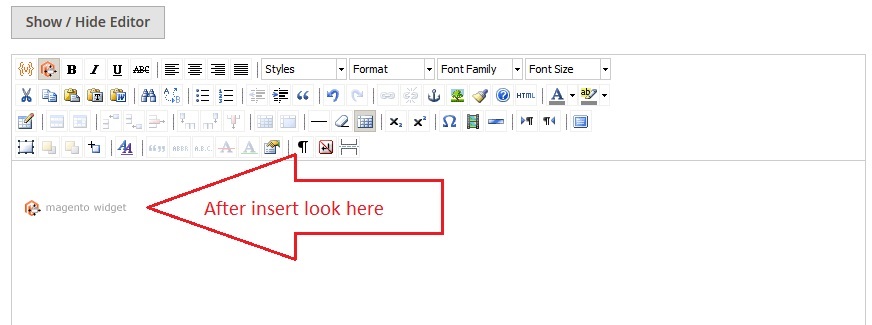
4. After insert Product widget:
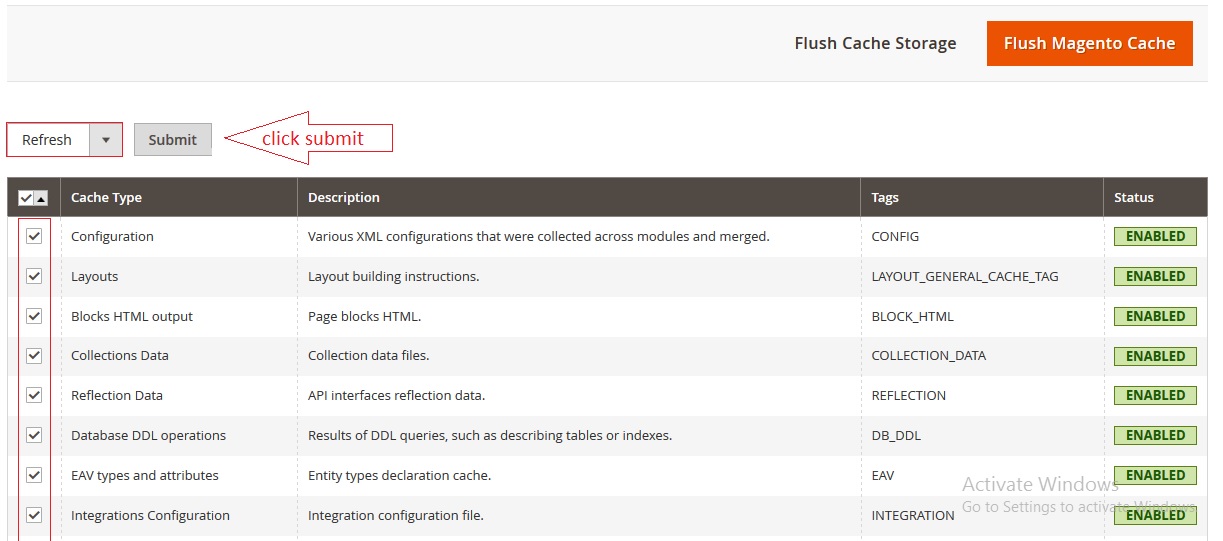
5. Continue go to SYSTEM >Cache Management >>Refresh >Submit > as image below:
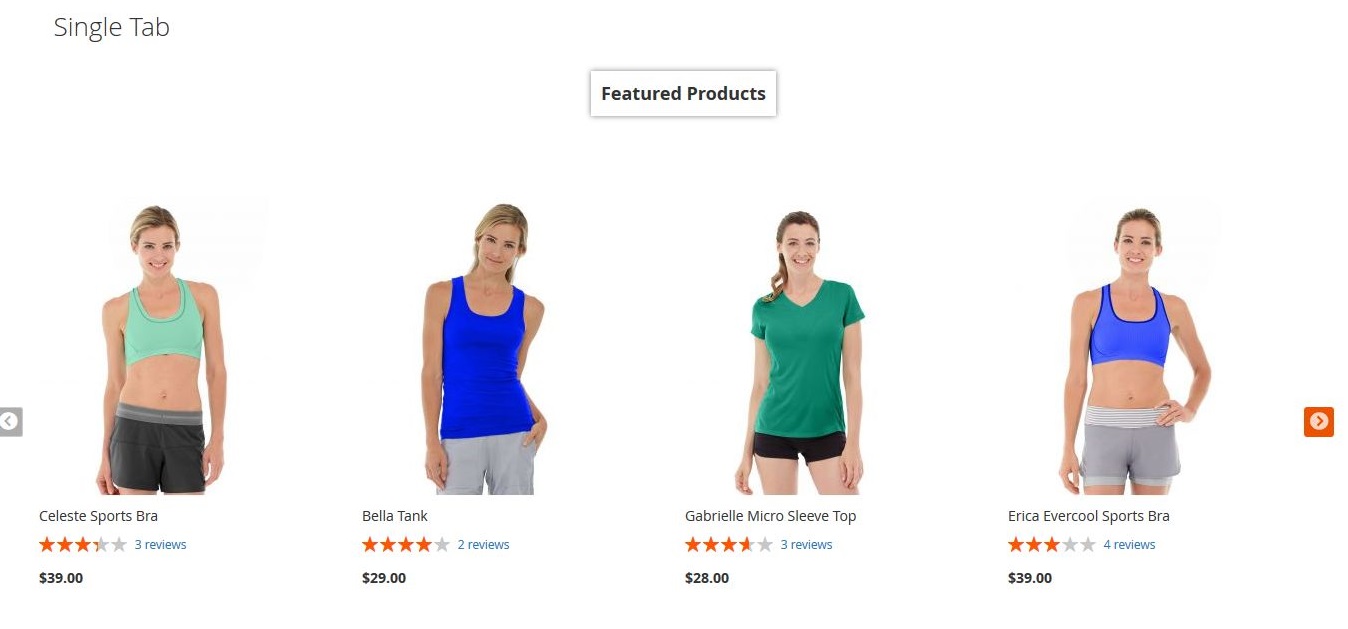
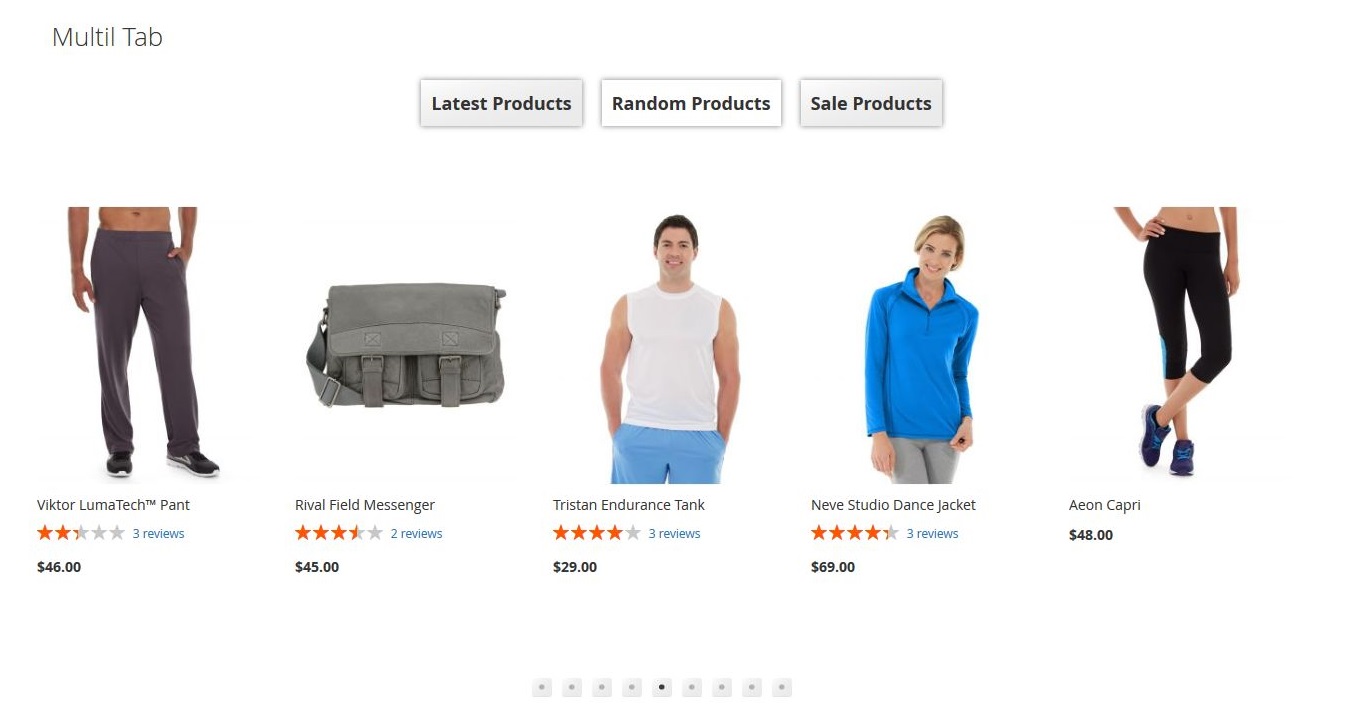
6. Now you go to frontend and refresh browser it will display as image below:
6.1 Single:
6.2 Multil Tab:
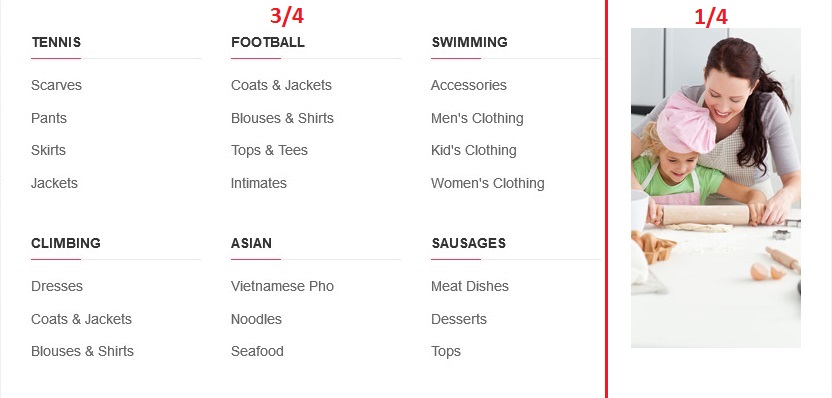
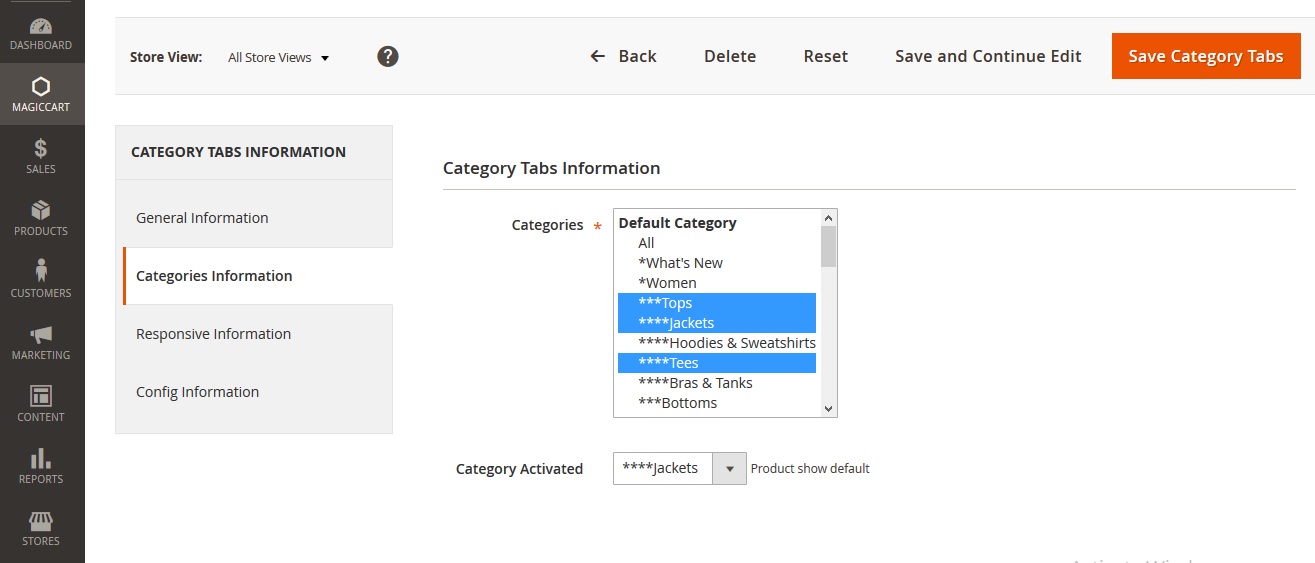
Magiccart >Magic Product > Categories >Add New Category Tabs > set Config as image below.
				Note Step 1:
				Tab "General Information": Config General.
				Tab "Categories Information": Config Product Filter with Category.
				Tab "Responsive Information": Config with template responsive.
				Tab "Config Information": Config Slide or Grid.
After the successful create Categories Tabs in step 1 you can show it in pages or block
Example show Widget Categories in home page:
1. Now you go to CONTENT >Pages >>home > Edit > as image below:
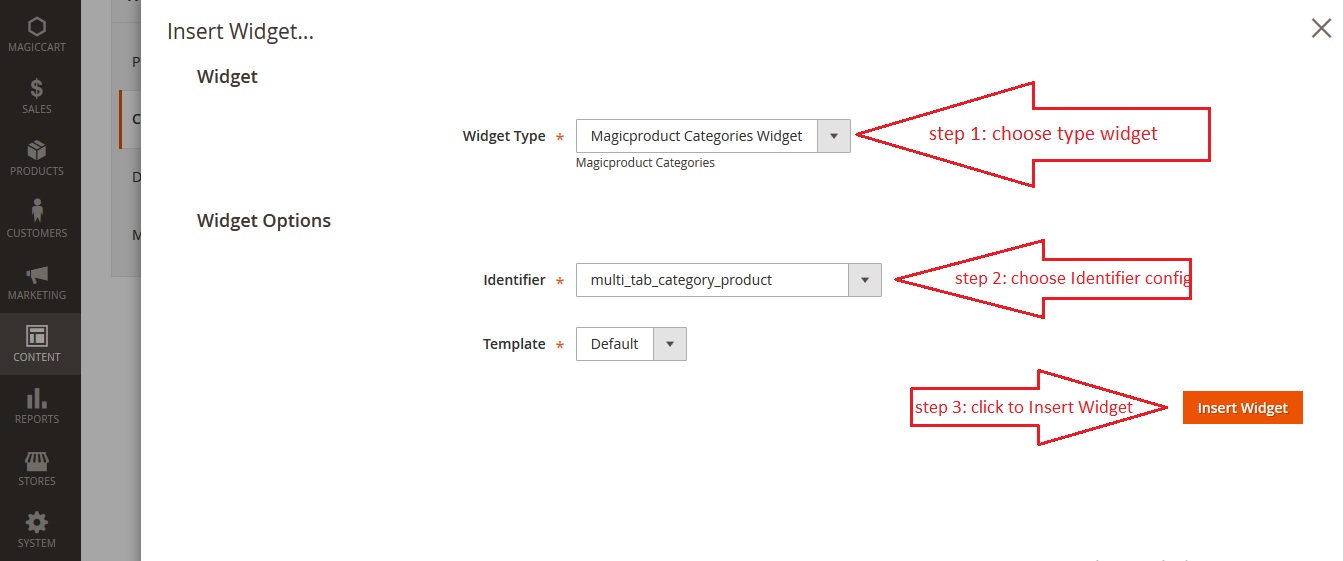
2. Click to icon widget:
3. Insert Categories widget:
4. After insert Categories widget:
5. Continue go to SYSTEM >Cache Management >>Refresh >Submit > as image below:
6. Now you go to frontend and refresh browser it will display as image below:
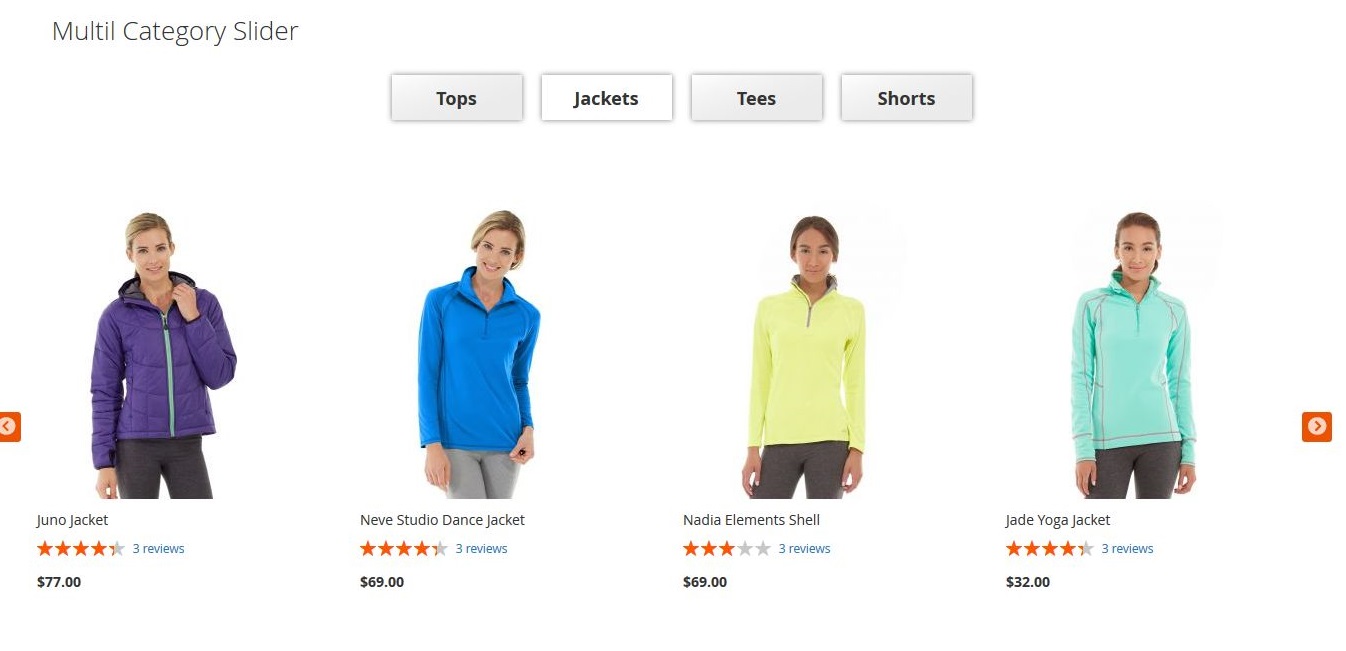
6.1 Multil Tab:
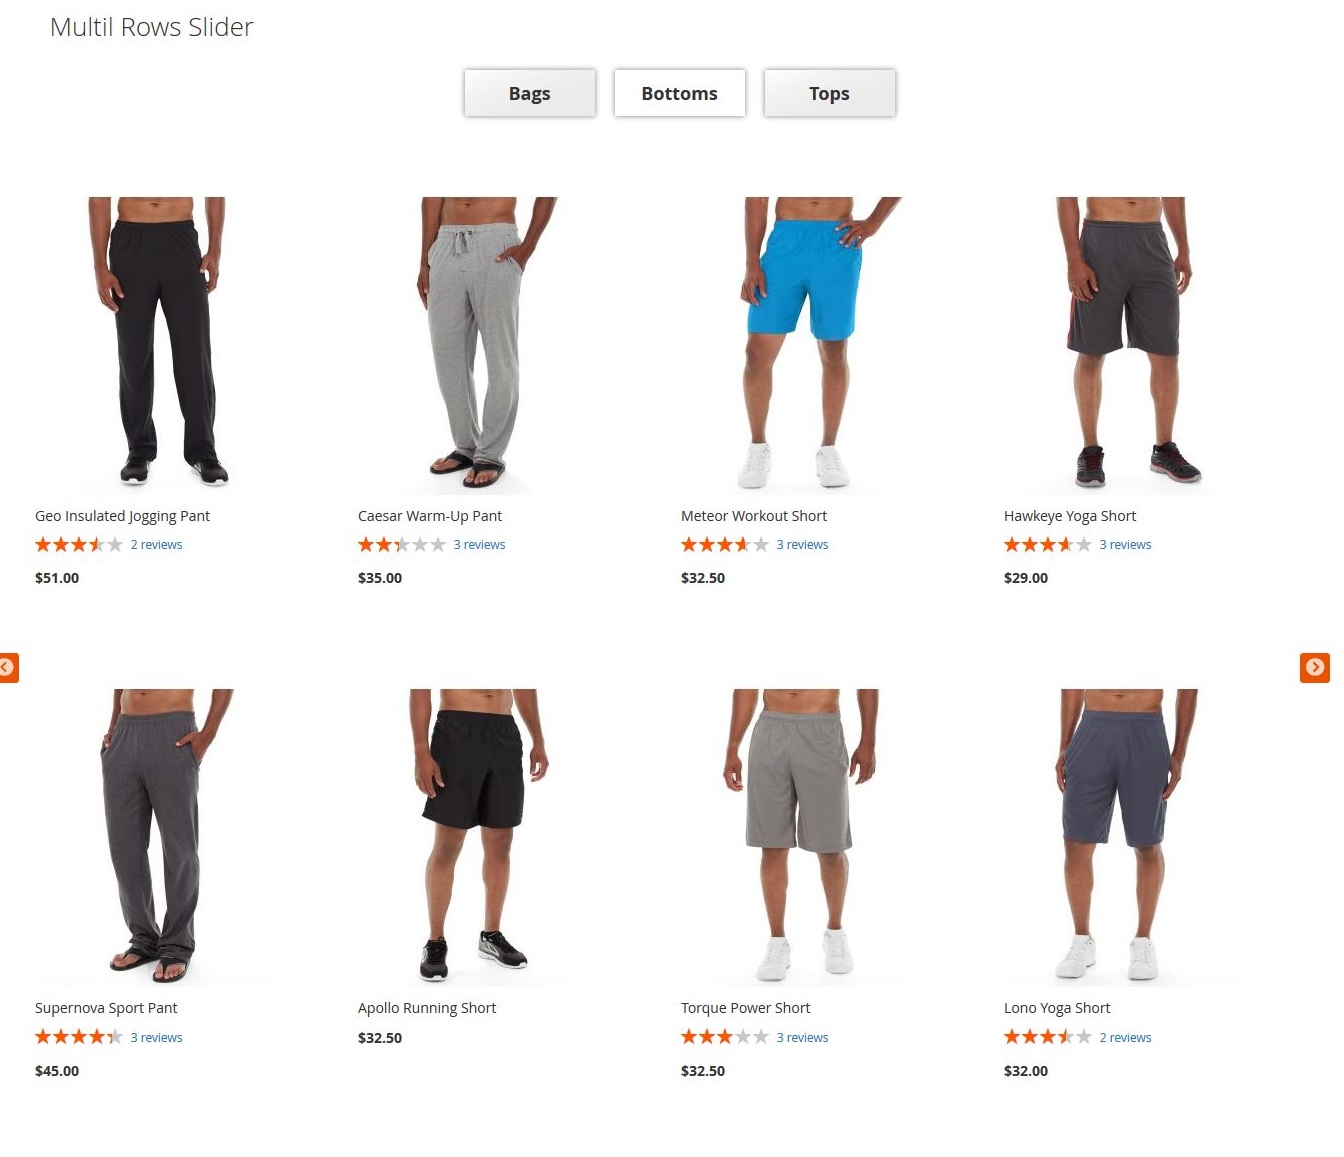
6.1 Multil Rows Slider:
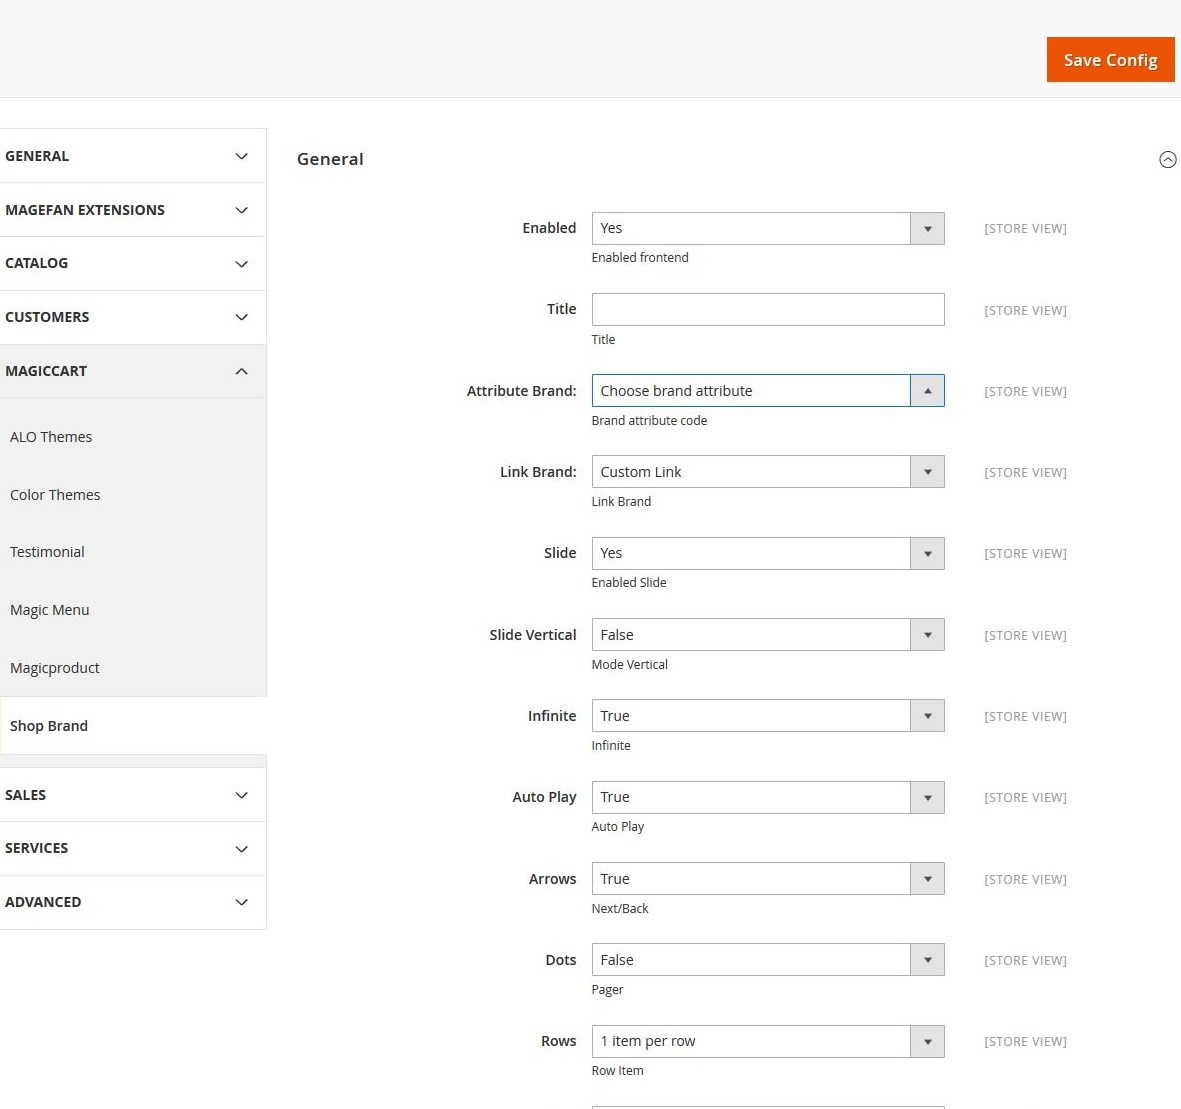
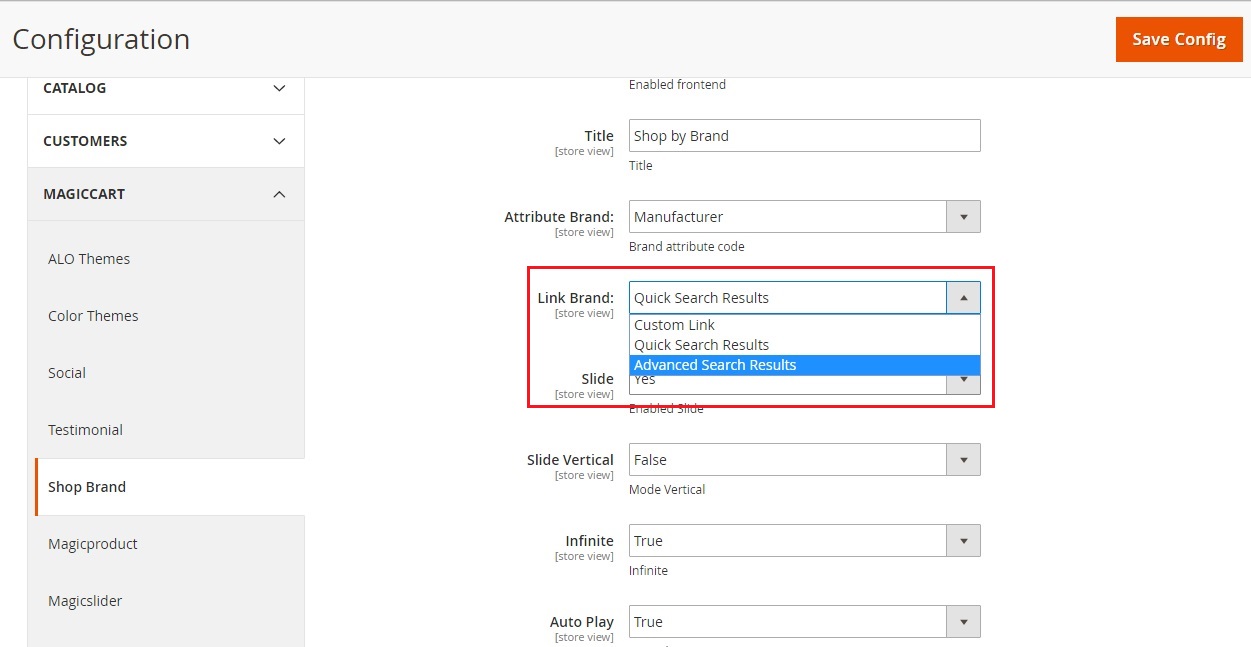
If you want to config Shop Brand, please log in: Admin > STORES > Configuration > Magiccart > Shop Brand It might look like this:
Admin > STORES > Configuration > Magiccart > Shop Brand It might look like this:
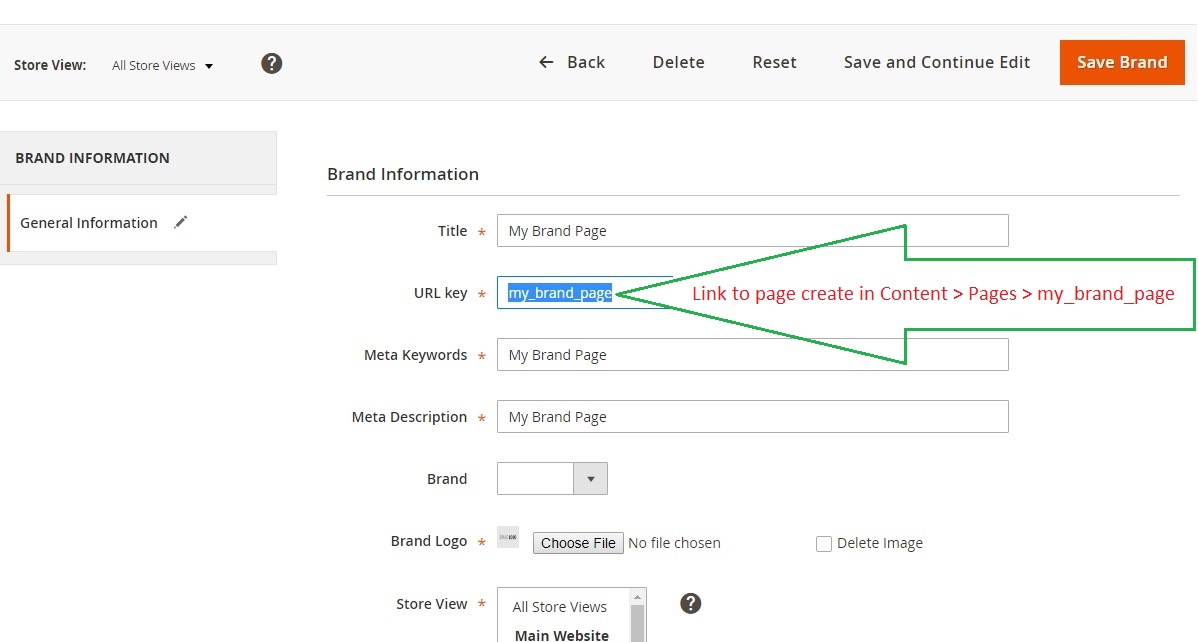
1. Custom link:
If use this option you can link to any link or page would you like.
Example: You can create new page brand in Admin Panel > Content > Pages > my_brand_page. This page you can create content, description for this brand ...etc
2. Quick Search Results:
This option will auto link brand to result search with name of brand.
3. Advanced Search Results:
This option will auto link brand to result search follow attribute brand of product.
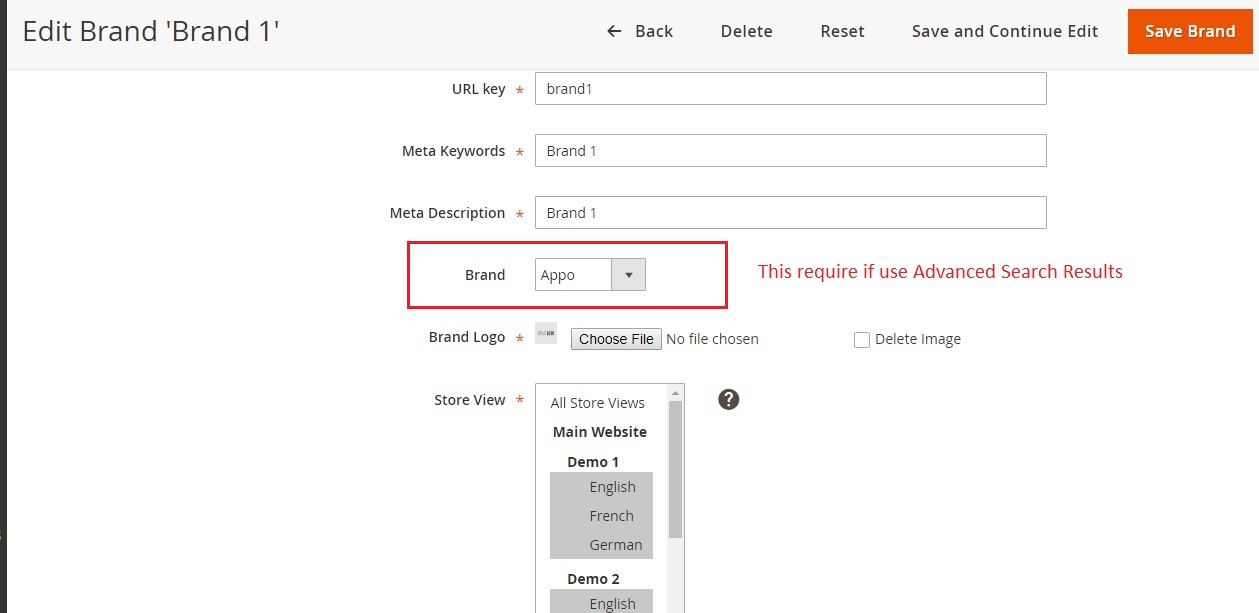
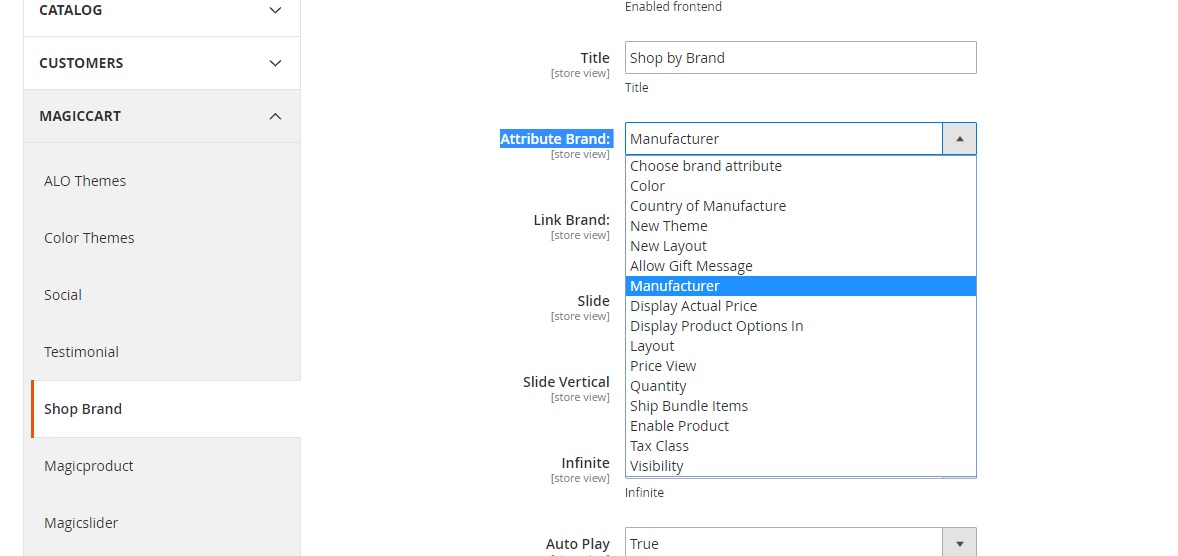
note: This option require you must choose brand as image below and "Attribute Brand" in section 6.4.2.2
If you want to config Shop Brand, please log in: Admin > STORES > Configuration > Magiccart > Shop Brand It might look like this:
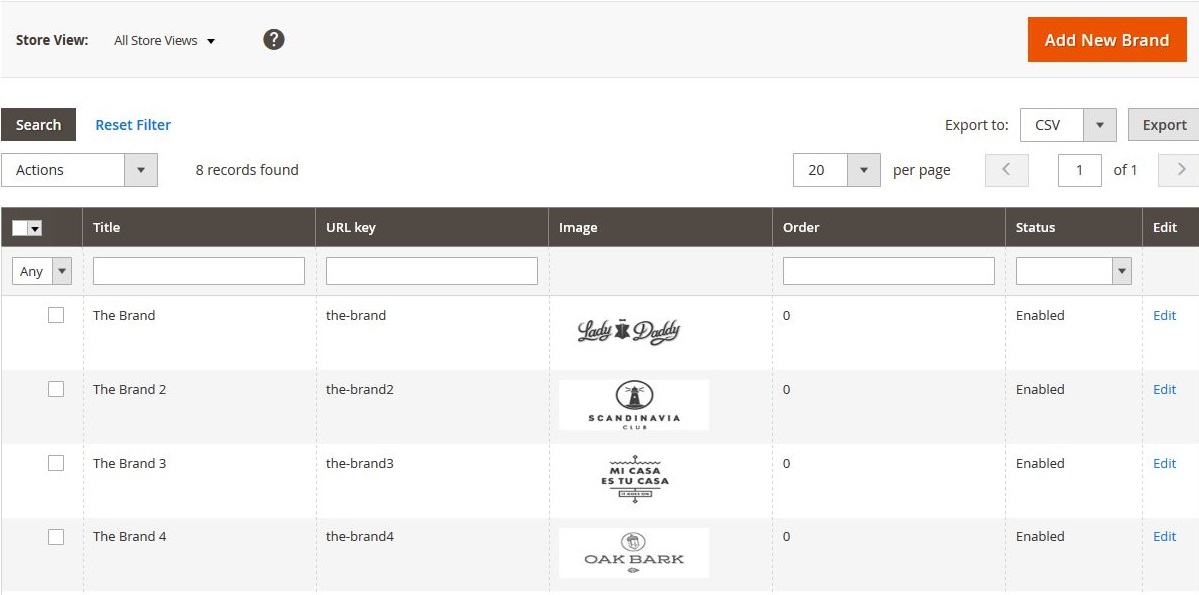
If you want add change, edit or delete item in Shop Brand, please log in: Admin > Magiccart > Shop Brand > Brand. it might look like this:
To add new brand logo,please Click" Add New".
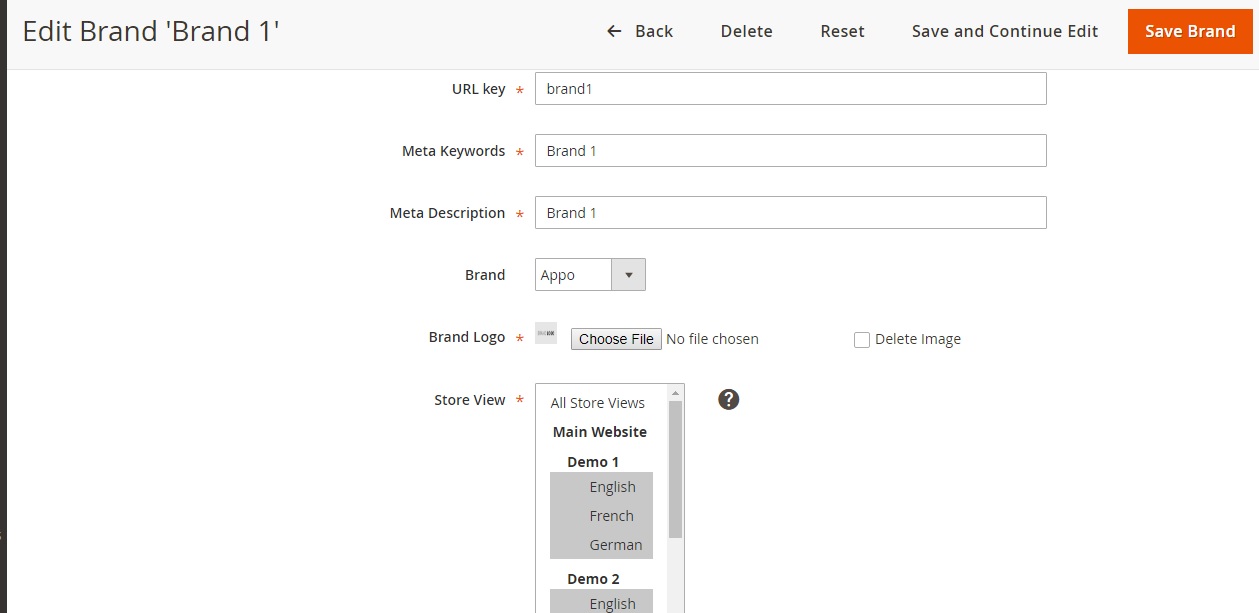
To Edit item, please select item and edit.
After that, Please Click Save BrandTo finish!
Support ticket
If you have found any bugs or have some other problems with this theme .If the problem is not covered there, feel free to contact us by support ticket. We will respond as soon as possible.
Author of the extension should provide detail edit struction about how to integrate the extension with any custom theme.
Thank for Purchase!